
Gena’s Bike

In the summer of 2015 a colleague of mine from Navos was moving and I volunteered to tune up her bike as she was putting stuff into storage. When she dropped it off for me the wheels were off but it was otherwise intact. She explained that she got the bike new in 1976 in Ft. Collins and said that all she knew about it was that it was a Windsor Carrera Sport made in Mexico and that she liked riding it more than any other bike she’d ever had. I immediately noticed that the bike had a lugged steel frame with a lot of chrome.
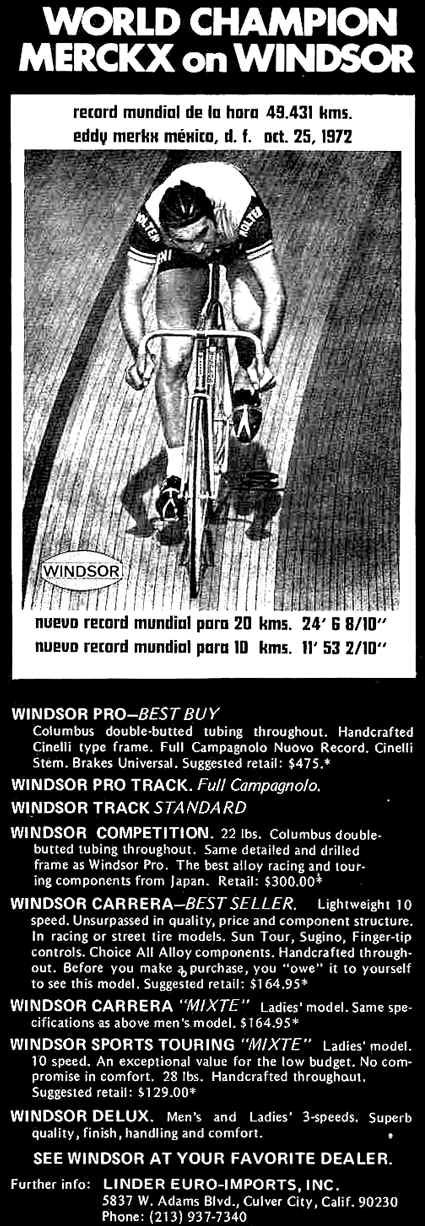
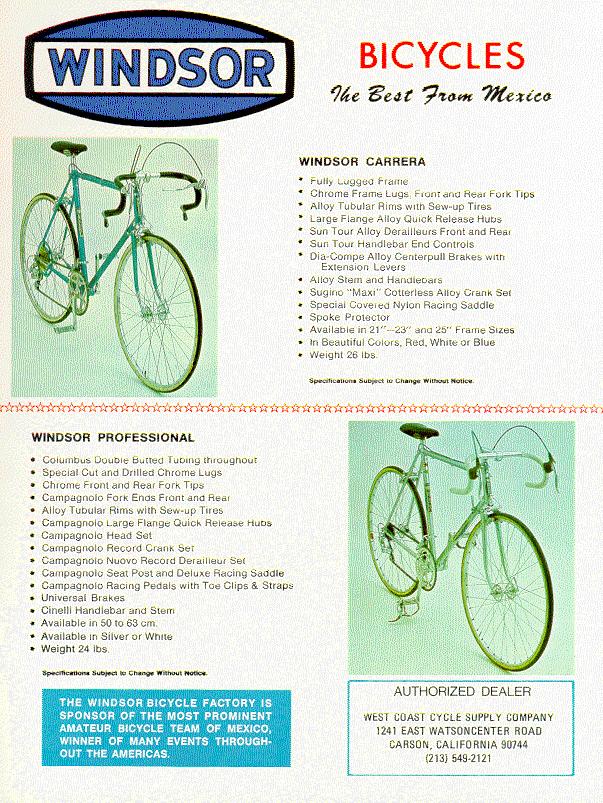
I spent some time with Google and learned that the Mexican steel company Acer-Mex made several brands of bicycle in the ’70s and ’80s. The Windsor mark was applied to some Italian-style 10-speeds that were made for export. The top of the line (“professional”) model had Campagnolo components and lightweight double-butted tubes and were evidently pretty good bikes. (There was a scandal in which Acer-Mex sponsored Eddie Merckx in a one-hour record attempt in 1972, but he reportedly rode a Colnago with Windsor decals…) The Carerra (aka “international 10-speed”) was the bottom of the line but the “sport” variant seems to have had Japanese Tange straight gauge tubing and better components. Both versions of the Carrera used quality midrange Japanese components – Dia Compe brakes, SunTour deraileurs, shifters and freewheels, Sunshine hubs and Sugino cranks and bottom brackets. Gena’s 19 1/2-inch frame was originally red with chrome chain stays and fork tips. It has serial number 029852 on the upper left side of the seat tube and a Ft. Collins bicycle registration sticker.
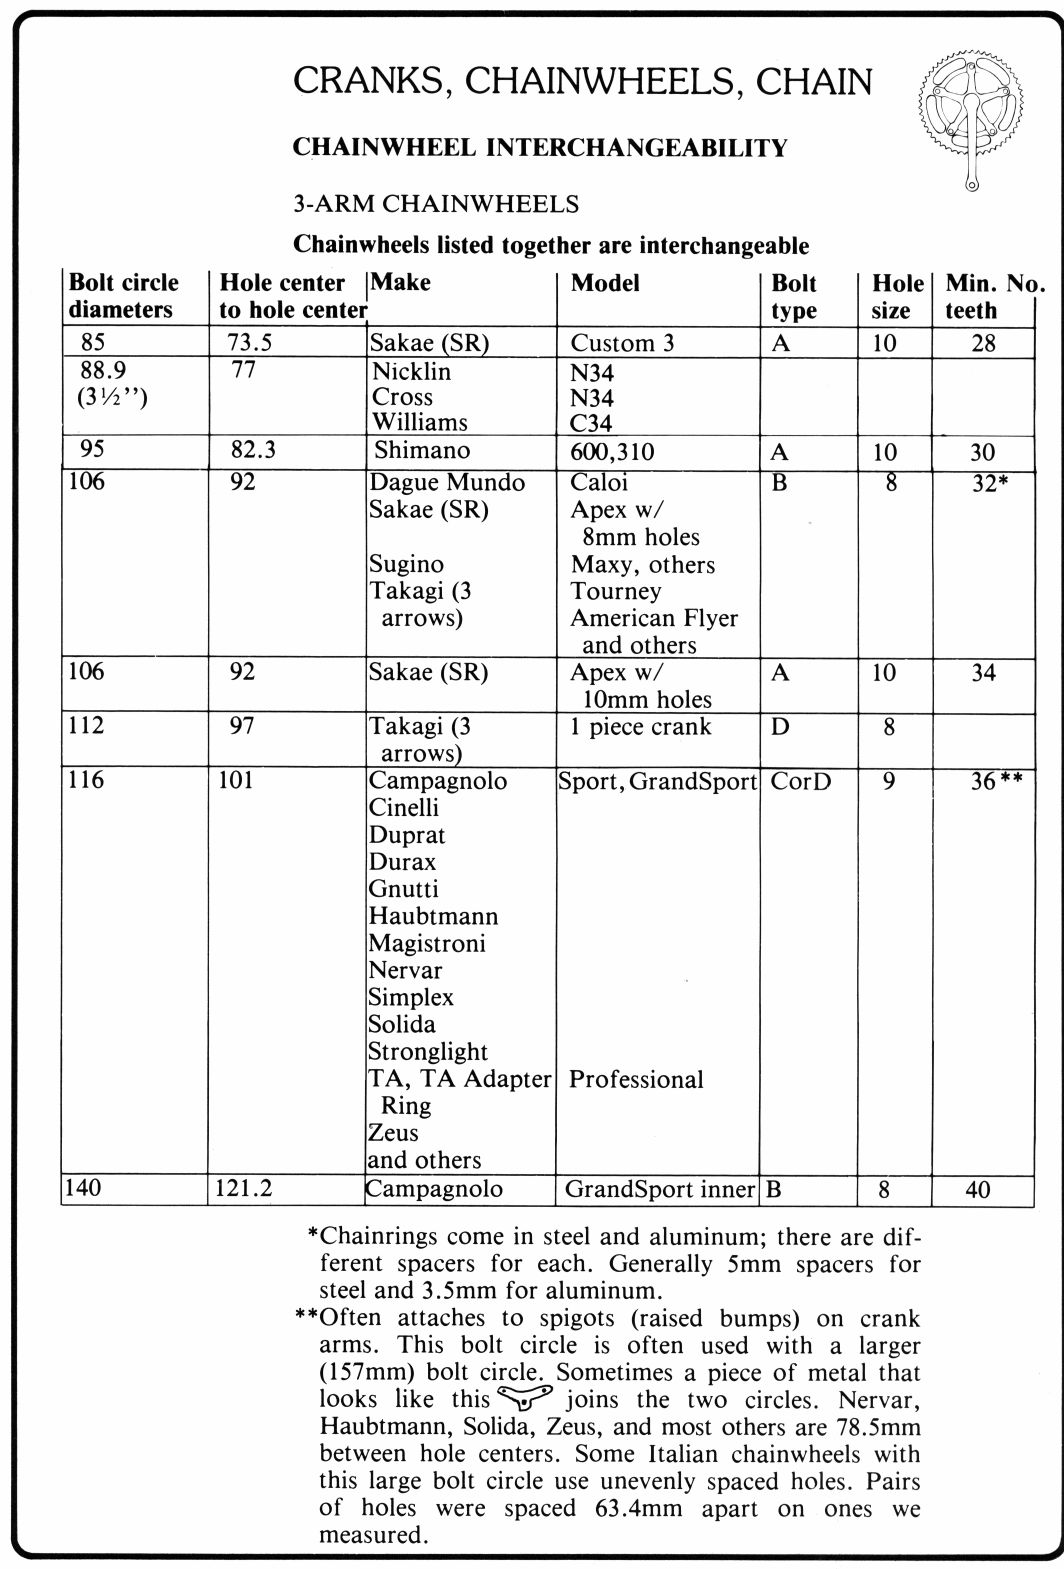
I learned that the Italian influence was probably related to Acer-Mex’s hiring a senior Cinelli guy, Remo Vecchi, to run their bicycle factory. From today’s perspective the 1976 Carrera Sport was pretty non-standard. Maybe half of the bolt heads and nuts were imperial sized and didn’t fit my metric wrenches. It had Italian threading on a narrow (68mm) bottom bracket, an english-threaded headset with a .833 inch stem, and a 26.8mm seat post. It had 27-inch wheels and a 5-speed freewheel. The crankset was a Sugino 3-pin Maxy II where the 52T large chainring was permanently attached to the drive-side crank and the 40T smaller ring was bolted on with 3 chainring bolts (a 106 BCD, I believe, compared to Rene Herse’s 70). Here’s a component table as it was when I received it:
Frame & Fork:
Frame Construction – (Acer-Mex) fully lugged
Frame Tubing Material – chromoly tubing, maybe Japanese Tange, with forged SunTour adjustable dropouts
Fork – external box crown with SunTour fork tips
Fork Material – chromoly
Components:
Component Group – Dia Compe / SunTour / Sugino
Brakeset – Dia Compe centerpull (with “safety” levers)
Shift Levers – SunTour 3090 bar end shifters
Front Derailleur – SunTour Compe-V
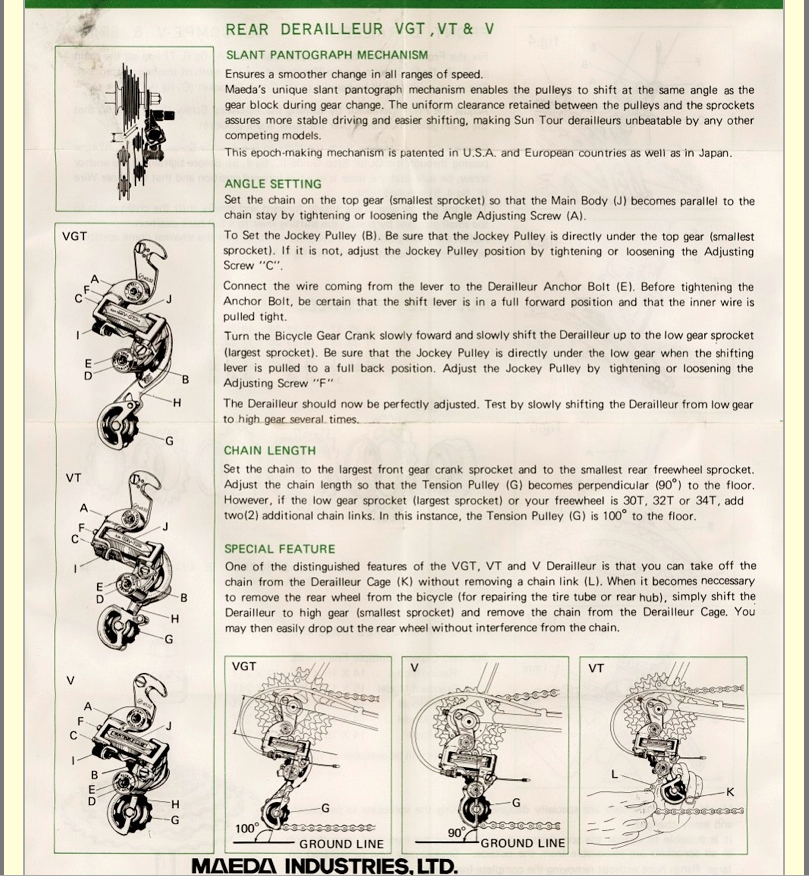
Rear Derailleur – SunTour-GT
Crankset – Sugino alloy Maxy II (3-pin) 40/52 70mm cranks
Pedals – Windsor steel rattraps
Bottom Bracket – Sugino cup & ball, Italian threading, spindle = 119
BB Shell Width – 68mm
Rear Cogs – Maeda Pro-Compe 5 speed freewheel (14-32)
Chain – generic aftermarket
Seatpost – Windsor chrome
Saddle – “covered nylon”
Handlebar – Windsor alloy
Handlebar Stem – Gran Compe (Dia Compe )
Headset – English threaded cup & ball – .833 inch stem diameter
Wheels:
Hubs – Sunshine large flange (36 hole)
Rims – Windsor alloy (hookless)
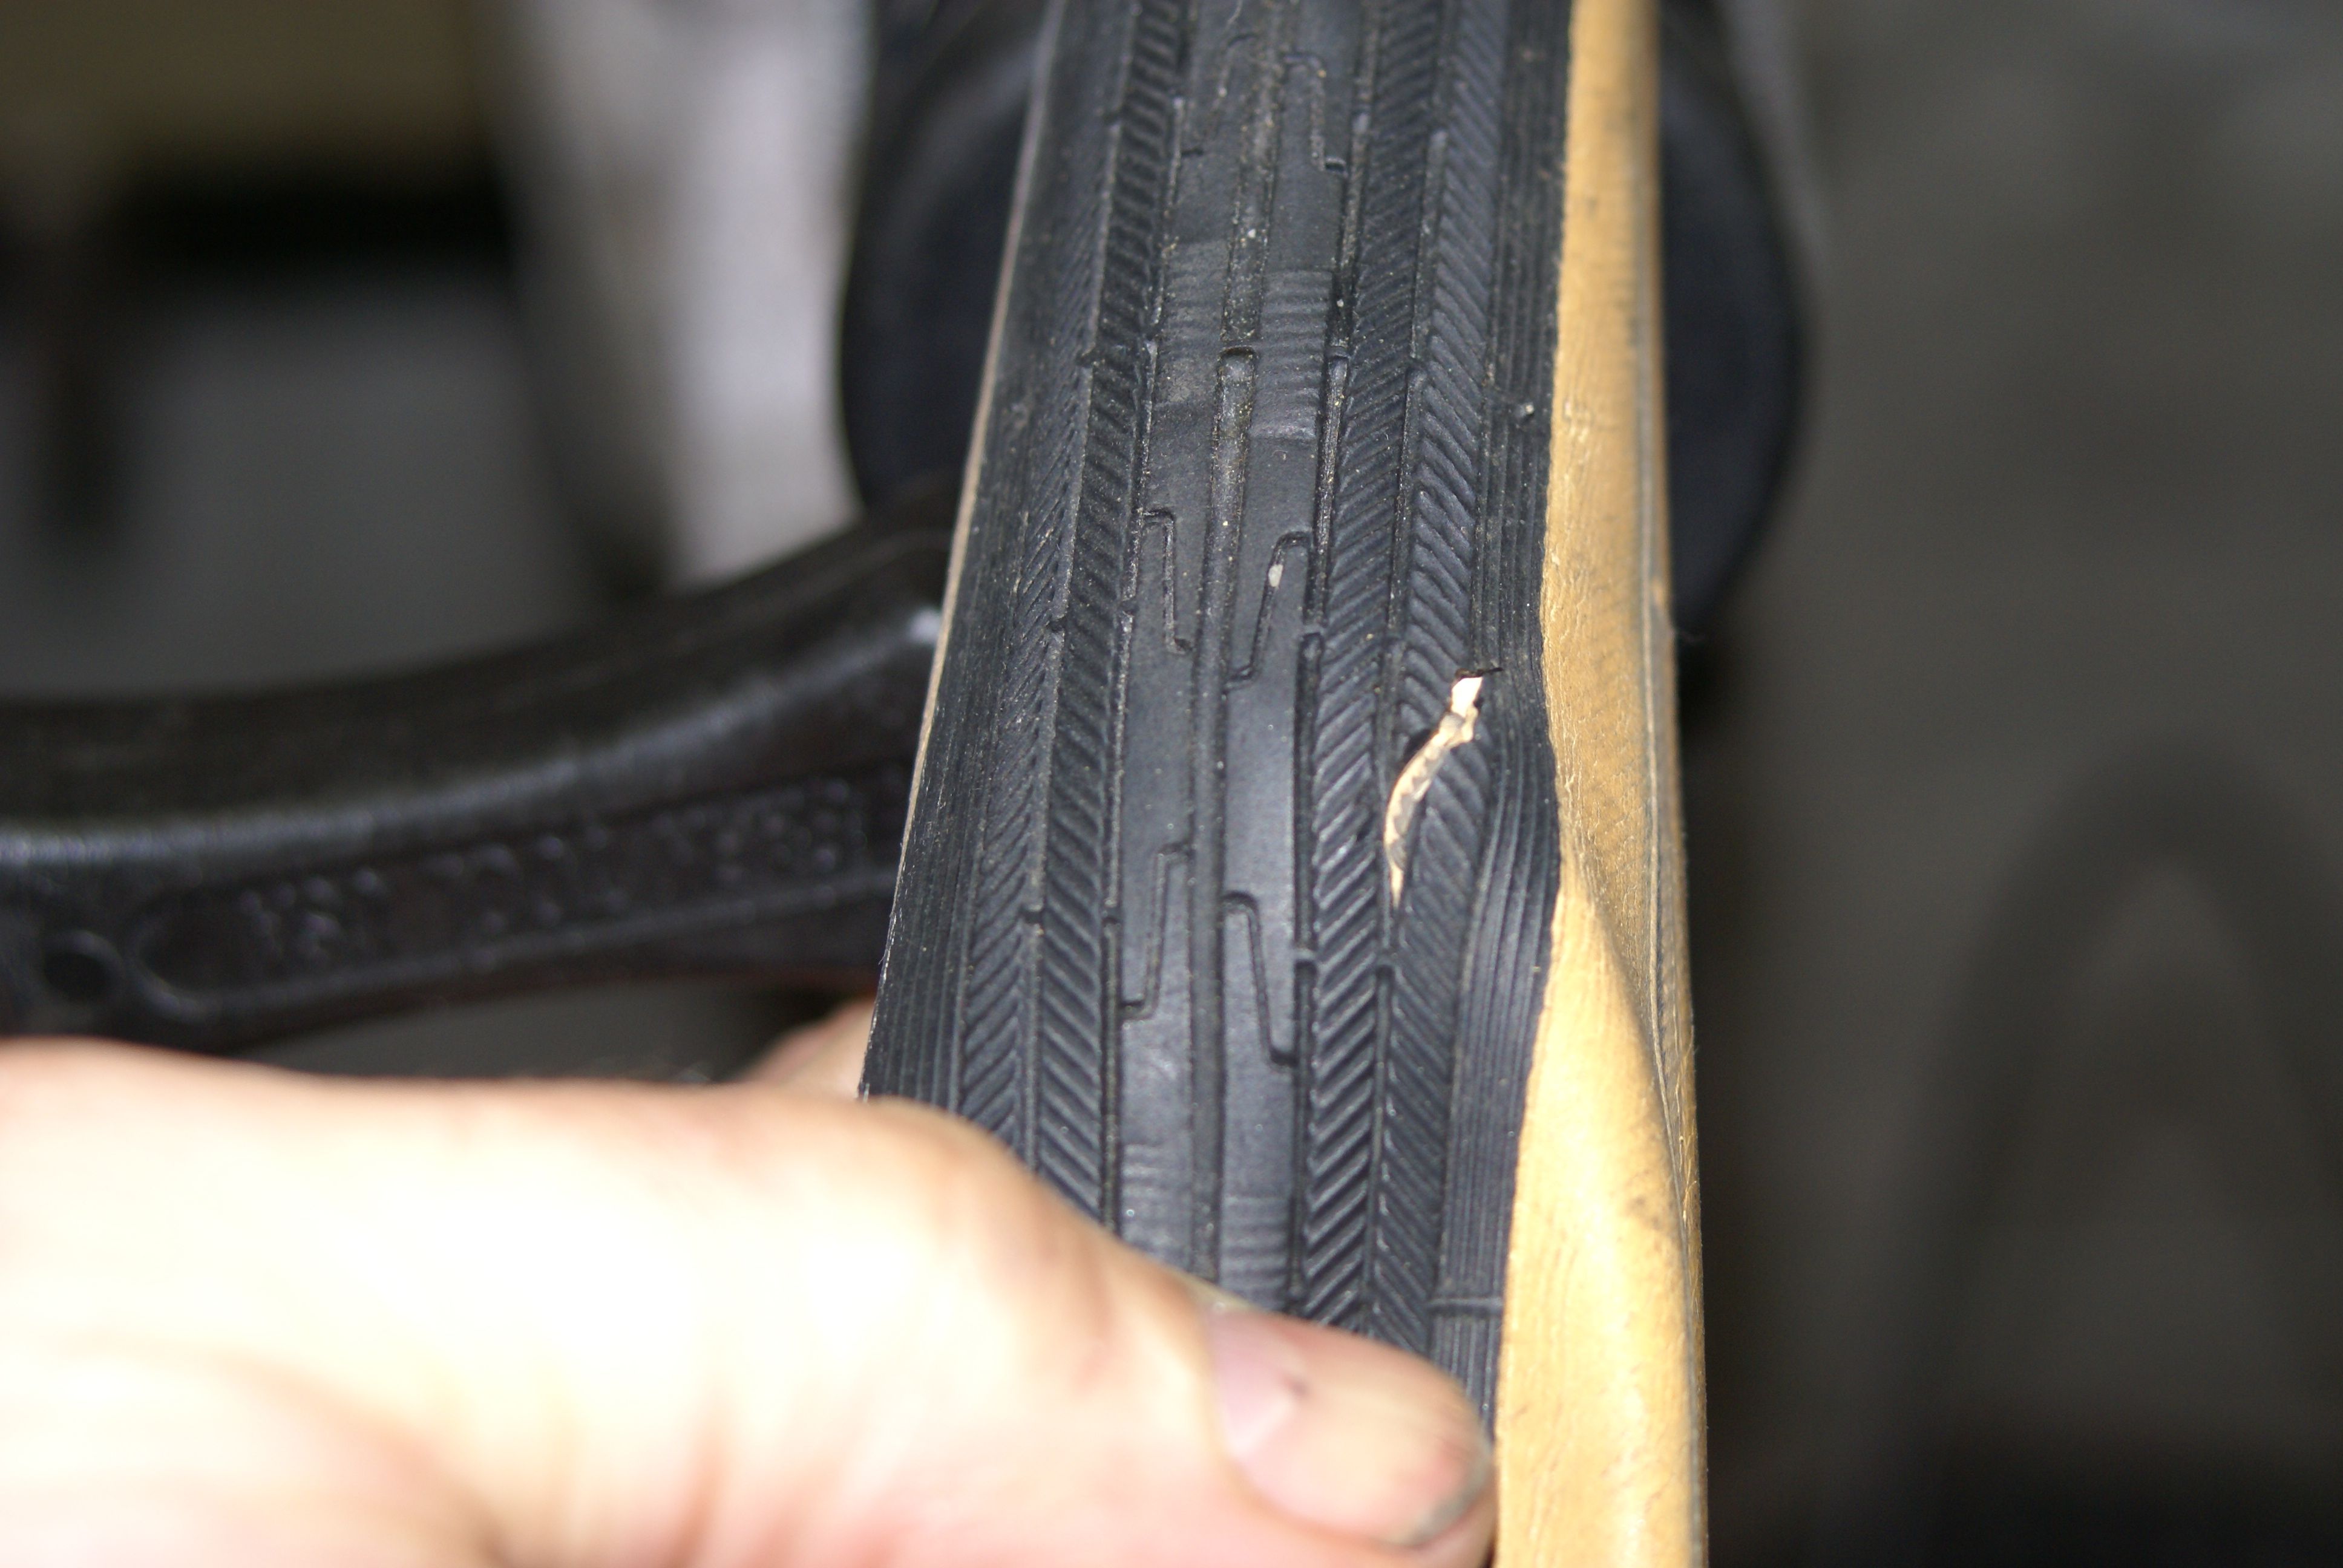
It appeared to me that the bike had new but flat tires because the tread was fresh and there wasn’t any dirt on them. When I went to remove the rear tire I noticed a split about an inch long that followed the tread pattern and as I pulled them off the rim the sidewalls around the bead crumbled off, making me think that it must not have been ridden for several years after those tires were mounted. (When I was finally able to inflate them it turned out that the inner tubes were rotten, too.) Since the headset and bottom bracket were well greased (albeit with a slimy, jelly-like, substance) I suspect that the bike was tuned before being allowed to sit for quite a long time.
Here’s a Windsor advertisement from the 1970s
Here’s a shot of a catalogue from the same period (and a link to the one from 1978)
Here’s a PDF of Gena’s owner’s handbook from when she originally got the bike
Here’s the “before” gallery.
The first step was de-greasing and cleaning the bike. I knew how to do that. The second step was removing the rust and polishing up the chrome. I bought some Mother’s metal polish and some Barkeepers Friend rust remover and got to work. There was a lot of chrome on this bike – it looks like the whole frame was chromed and that the paint was applied on top of the plating. There was a fair amount of rust on the the seat post and on the chain stays, but most of the chrome was not pitted very much at all and what rust was there was light. I could have invested in wet sand paper and worked through progressively finer grits but I didn’t. This bike is not exotic enough to warrant a mirror-perfect polish, it’s “best and highest” use is to be ridden. I did use abrasive balls up to about 320 grit and then some elbow grease with scotchbrite pads. I was pleased with how well it cleaned up.

here’s a gallery of polished parts.
I took the wheels apart and cleaned the grease out of the cups and off the the cones. Even though they looked reasonably well packed, I decided to replace the bearings. I didn’t put a lot of effort into polishing the hubs, but they cleaned up well with some degreaser and a rag. To finish the process the spokes needed a once-over with crumpled aluminum foil. (The spokes were all reasonably tight and as far as I could tell the wheels spun true. I tightened the non-drive side in the rear and then decided to leave well enough alone.) The rims don’t have hooks like more modern rims do – they may have been intended for sew-up tires instead of clinchers. They do seem very sturdy, though, with what appears to be solid aluminum where a modern rim would have a double wall.

Here are some photos of the wheels.
I started the reassembly process by rebuilding the bottom bracket and headset and mounting the cranks and fork. (I had to re-do the drive-side crank because I had mounted the smaller chainring with the bolt heads on the wrong side.) I bolted the cable stops to the down tube and chain stay, gauging their position by the lines where the paint hadn’t faded. I put on both derailleurs and both brakes. I put the stem in the steerer tube and mounted the handlebars. I got the brake levers on in the same place they’d been before and I mounted the saddle on the seat post and stuck the assembly in the seat tube. I started to mount the shifters but the expander bolts were stuck on both sides. I fiddled with one until it opened up and then I greased it well and mounted it on the left. As I reefed on the other one it loosened suddenly and I discovered that I’d torqued the end off of the expander bolt. A trip to Recycled Cycles uncovered bad threads in the housing and got me a $5 replacement for the whole shifter.

Here are some photos of work-in-process.
While at Recycled Cycles I bought 27″ tires and tubes (both by Kenda.) I reassembled the hubs with a generous packing of grease and new bearings. I did the adjustment of the cones with my fingers and fought a little with one of the locknuts (the drive side in the rear.) None of my pumps work with Schrader valves so I ordered a schrader => presta adapter – and then realized that I had a CO2 inflator that worked with either type of valve. The tires went on with just a little help from the levers and I had two 12 gm cartridges that I figured wouldn’t give a pressure much over 60 lbs on a 1-1/4 inch tire. The wheels looked good inflated and they spun fairly true and free once I put them on the frame – but boy are they heavy!
I measured the chain for wear and it was still good, but it was tacky with old grease. I stuck it in a basin of simple green overnight and stripped the grease off, and then I used an 8-speed Wipperman link to put it back on the bike. I figured that I could use it to get the cables set and the derailleurs adjusted, but I splurged on a new KMC chain that I put on before I got done.

I installed brake cables with new housing and then mounted new brake pads. The Dia Compe levers use the round end of the universal brake cable, as opposed to the barrel end that I think I’ve always used before (I only cut off the wrong end once.) One of the levers took a ferrule on the end of the housing but the other didn’t. The straddle cable carriers had different sized nuts & bolts in the front vs. the back. At the end of the day I decided that I liked the center pulls – they’re super easy to set up and they seem to adjust easily.
I installed shifter cables with the original flexible metal housing. I had the cable stop on the chain stay reversed so I had to take that off and fix it. Friction shifting makes it a lot easier to set up the derailleurs – I was surprised at how simple it was to get these hooked up. I spent some time fiddling with limit screws and and clamps but at this point I was really close to having a rideable bike.
Here are some pictures at the “almost rideable” stage.
I intended to just mount the pedals but instead spent a few hours with Barkeepers Friend and a scotchbrite pad and got most of the rust and grease off of them. They’re heavy, but actually pretty cool. (They don’t make ’em like that any more.)

Here are photos of the pedals.
I fiddled with the shifters and figured out that I had the barcons rotated 180-degrees from where they should have been. I had to release the cables to fix that, but with these derailleurs that wasn’t a big deal. After I was satisfied with the shifters I taped the handlebars. For some reason the left side came up about an inch shorter, but I couldn’t see any place where I’d made the wraps too close. I put the kickstand on and had to adjust it a little so that the cranks cleared it. I put the new chain on and then reworked it because the link I punched was sticky. At the end of the day I rode the bike up and down the block to check the brakes and shifting. It worked okay, but that frame is sure small.
I spent some more time on the back derailleur – it didn’t seem to be taking up enough slack on the smaller chainring. I discovered that the SunTour GT derailleur is designed so that you can take it off the bike without breaking the chain. I ended up having a guy at Recycled Cycles take a look at it and after a long discussion about spring tension and trial-and-error he fixed it for me. I bought some 12-gram CO2 cartridges and a set of tire levers to make up a saddlebag toolkit. I put a little more time into truing the rear wheel and quit when it seemed like I’d made it better than when I started. I noticed that the bottom bracket was wobbly so I took the cranks off and tightened it. I fiddled some more with the limit screw on the front derailleur until it didn’t seem to want to over shift anymore (at least not while on the stand.)
And then I decided that I was done.

Here’s the “after” gallery.
If it were my bike I might:
- invest in a sealed bottom bracket (both Phil Woods and SCF make Italian-threaded cartridges.)
- rebuild the wheels with hooked rims so I could mount higher pressure tires (that would also give me an excuse to buy a truing stand.)
- think about having it repainted. I suspect that you can’t powder coat over chrome, so it would likely mean me stripping the old paint and masking the lugs, chain-stay ends and fork ends before wet painting at R&E. I’d also have to buy a set of decals.
- I might go with lighter, more expensive tires (like the Panaracer Pasela Tourgard.)
- I might replace or rebuild the freewheel – although the new ones don’t get good reviews online and I’m not sure what would be involved in rebuilding the original Maeda/SunTour.
- I would add a clamp-on water bottle cage and trade out the plastic cable guides for metallic ones.
- I would probably find some lighter pedals, and personally I’d lose the kickstand.
None of this would make any economic sense – those first three three items alone would cost roughly $1,000 for a bike that would sell on CL for maybe $500 or $600 – but it’s a reasonable bike for Seattle’s hilly terrain and the old-school appearance and the simplicity of the components make it really attractive.
What a labor of love! I found an old Windsor 10 speed in my dad’s garage – cleaning out the house in Brooklyn. It is very similar to the one you restored – it is a rust bucket and weighs a ton but the geometry is perfect for me, the frame, though heavy, is responsive, and I can ride faster on it than on my Bianchi commuter back home. Of course New York is flat compared to Seattle.
Jerry! Sadly…with all my life changes over the past several years, I hadn’t ridden the bike! Yesterday, I put air in the tires. Today I am going to the storage unit (yes, I’ve moved yet again and everything(!) is in storage right now) to see if I can find the box containing the bike helmet. If I find it, I am riding today!
Hey, Gena – hope things are well with you and that you got a good ride in. I’d love to catch up with you, and obviously you need to let me know if you’re ever back in Seattle.
Jerry
Just bought a Windsor Carrera Sport on Craigslist after reading your blog. I knew it would be a good recipient for the spare Italian threaded Campy crankset & headset I had sitting around.
Fun bike! Thanks for enlightening and enabling me!
Hi Jerry, very cool thread, and a very nice rebuild. I found a Carrera by chance on letgo. The chrome lugs, though barely visible grabbed my attention. I’ve read a similar story or two… a teeny glint of chrome shines thru, and the curiosity kicks in. Didn’t know what it was until I saw a sprayed over decal. Like the rest of the bike, every inch was spray painted flat black, except the wheels… sprayed silver (including spokes 😲) Anyway, for $60 I took it home as a fun project. As of this writing, I’ve stripped the frame, and plan on painting it a gloss olive green for some reason. It should look cool w/ the decals. A few components were wasted, so I’ll be replacing the brake system… something vintage Suntour. Interestingly, Suntour’s VGT-luxe derailleur was one of their best-selling units for 20 years. It’s a great, smooth shifter, so I’ll prob keep it and the Maeda front, but going with downtube shifters. Frame is paint-ready. Taping off the lugs took a while, but looking forward to the ‘unveiling’. I will keep you posted on my progress. Again, nice job! Steve
Hello,
First of all, great post. I am from Mexico and my father had a a forgotten bike since 80´s (before I borned). Always it was hanging . Just yesterday and after to inisist to my father that gif me that bicycle and sended to workshop to maintence, I could rind it for first time and is a incredible bicyle. Of course isn´t the same bicycle that have your friend, but I could saw it in the catalog that your posted. I am exited to learn and read abouit its history and I don´t import me that it had be the most cheaped of the catalog. For me hasn´t price.
How this bicycle come to my father is other history. But after much years I can see, have and riding this great bicyle.
Thanks a lot for your investigation I was greatfully read it.
I add a link where you can see my bicycle.
https://drive.google.com/file/d/1KimBTuaobEdf58mukwRYq64WKFqcjuQ0/view?usp=sharing
Regards!
Julio C.
Followup to my 2/17/2020 post… I bought the rattle can flat black Carrera. As I’d mentioned earlier, I detected a tiny glint of chrome lug in the ad.. probably where some flat black had rubbed off… ‘praise the lowered’. The rebuild is complete. Decided on an olive green, upgraded everything piece by piece to Suntour Cyclone, including downtube shifters… all in awesome shape. Nice brake levers were impossible to find, so I got a rough set, stripped the anodizing, sanded, and high speed polished. Went with a NOS 90s Suntour x3 Crankset. I forget the group, but it’s 2-tone grey and super-reasonably priced. Wheels are old Mavics in great shape. New freewheel and Chain. And, of course new decals. Couple of personalized touches.. white seatpost and saddle. Very nice and crazy inexpensive on eBay. Came out wonderfully, except the chip I acquired the day I test-rode. Now there are two 😃. Pictures :https://www.dropbox.com/sh/x91ep4mjzxi8wr3/AADVVs37tyV5tydopPg1x9Tsa?dl=0
Very interesting read. I have the same bike hanging in my rafters for a couple decades now. I recently purchased a fat tire Ebike that I ride the majority of the time, but miss the elegance of a road bike from time to time. I’m thinking I will replace the tires and tubes, clean it up and see if it still roles well. Probably won’t spend the kind of time you did, but if I really like it, maybe I’ll but an E-road bike.
Hello Jerry,
I love your posts, and can’t believe how much you’ve done. I’ve cycled through Europe about 15 times throughout a 32 year teaching career, but have not covered nearly as much ground as you.
I stumbled upon your blog as I was looking for a mount for my own Serratus front handlebar bag. The system is simplicity itself and although I have the front bag, I lost the mount along with a bicycle several years before covid struck.
If there’s any chance that you’ve replaced your bag with something you prefer, I would give my eye teeth for any unused or unwanted mount which you might have ! Unlikely I know, but I’ve never seen as simpler or better system – which I guess is why they stopped making them. Please do let me know if you’ve one you no longer need, or know of a possible source for one, either alone or with the complete bag. My bicycle is a 1985 Myata 1000 (bought for $600) which I have used ever since my first European cycling trip from John O’Groats to Land’s End – and I’ve just recently bought a second identical bicycle from a tri-athlete (in perfect condition) for the same 1985 price of $600. I have an identical pannier bag for it, but the mount was lost on an earlier bike I leant to my nephew who I took cycling in Germany 10 years ago! “No good deed goes unpunished!” as they say.
Thanking you in advance if you can be of any help!
Mark
https://lonepeakpacks.com/product/handle-bar-bracket/
Hi-
Enjoyed your write-up on this- beautiful job. After reading thru, saw your listing for the trip to France in 2016, with Odette. Was struck by the picture inside a church, of the stained glass. It is picture 19 in your set. Can you tell me where it is? And the name of the Church? Thank you-
Tim