
My main ride for a lot of years was a 54 cm Fuji Touring that I bought new from Recycled Cycles in late 2000. It had a steel frame and a Tiagra groupset – Deore RD and Tiagra FD (with 52-42-30 in the front and a 9-speed 11-32 cassette) Tiagra hubs and Avid brakes with Tiagra brifters. The BikePedia entry says that it should have had Sora components but the 2001 entry matches my bike pretty well except for the headset: (The frame geometry matches the 2000 image but the colors are 2001. The hubs say Tiagra, though, and have 32 holes, while both years’ entries would have you expect Sora with 36 holes.)
|
||||||||||||||||||||||||||||||||||||||||||||||||||||||||||||
I did a lot of excellent rides on this bike – several STPs, Ramrod, RSVP, Washington Pass and a ton of local tours. After a few years the brakes got changed out for another Avid model that was shaped as a triangle where you had to go into the center to change the brake pad using those mountain bike pads with a nut on the post. I also commuted on it and mounted partial fenders for those rides. In 2012 I got hit by a car while on my way to work and the rear wheel got mangled. I replaced that but didn’t do anything else to the bike (the handlebars were asymmetrical afterwards and the rack had a bent stay) and instead got a new bike. I kept riding the Fuji as my “rain bike”, but it was no longer a commuter after I stopped working in 2013. I rode it enough in the rain that I knew I wanted to have it serviced before the 2013-14 rainy season, even though it had less than 1,000 miles since the last tune-up.
When I took it in to Greggs Cycles for service I got an attitude about how old and beat-up it was and was told that the rear wheel wear indicator was showing and that they didn’t want to work on it unless I was willing to replace the rim. Considering that I’d replaced the rim (at Greggs!) a year earlier, and had ridden it maybe 600 miles since then, I was not particularly happy – but I ended up having them build two new wheels for me with Mavic rims on the Tiagra hubs. The handlebar tape had a gap in it and I asked them to put new tape on it – they said it was in “good enough” shape but that they would be glad to re-wrap it for me. They also sold me on a “cartridge” kind of brake pad where I only had to change the rubber not the whole assembly. Of course when I picked up the bike and asked to be shown how that worked the guy on duty at the time had no idea what I was talking about and told me that I still had to buy a regular brake pad and mount the new post.
A couple of months and maybe 500 miles later I was hearing scraping noises from the rear and sure enough there was metal showing through the brake pads. I was fed up and as it happened I was taking a tandem into R+E at that time and on impulse I bought a set of the cantilevers they fabricate. I didn’t change the brake cables but just mounted the brakes and hooked them up and discovered that I loved the way it rode again – no noise, plenty of stopping power and a solid feel in the lever.
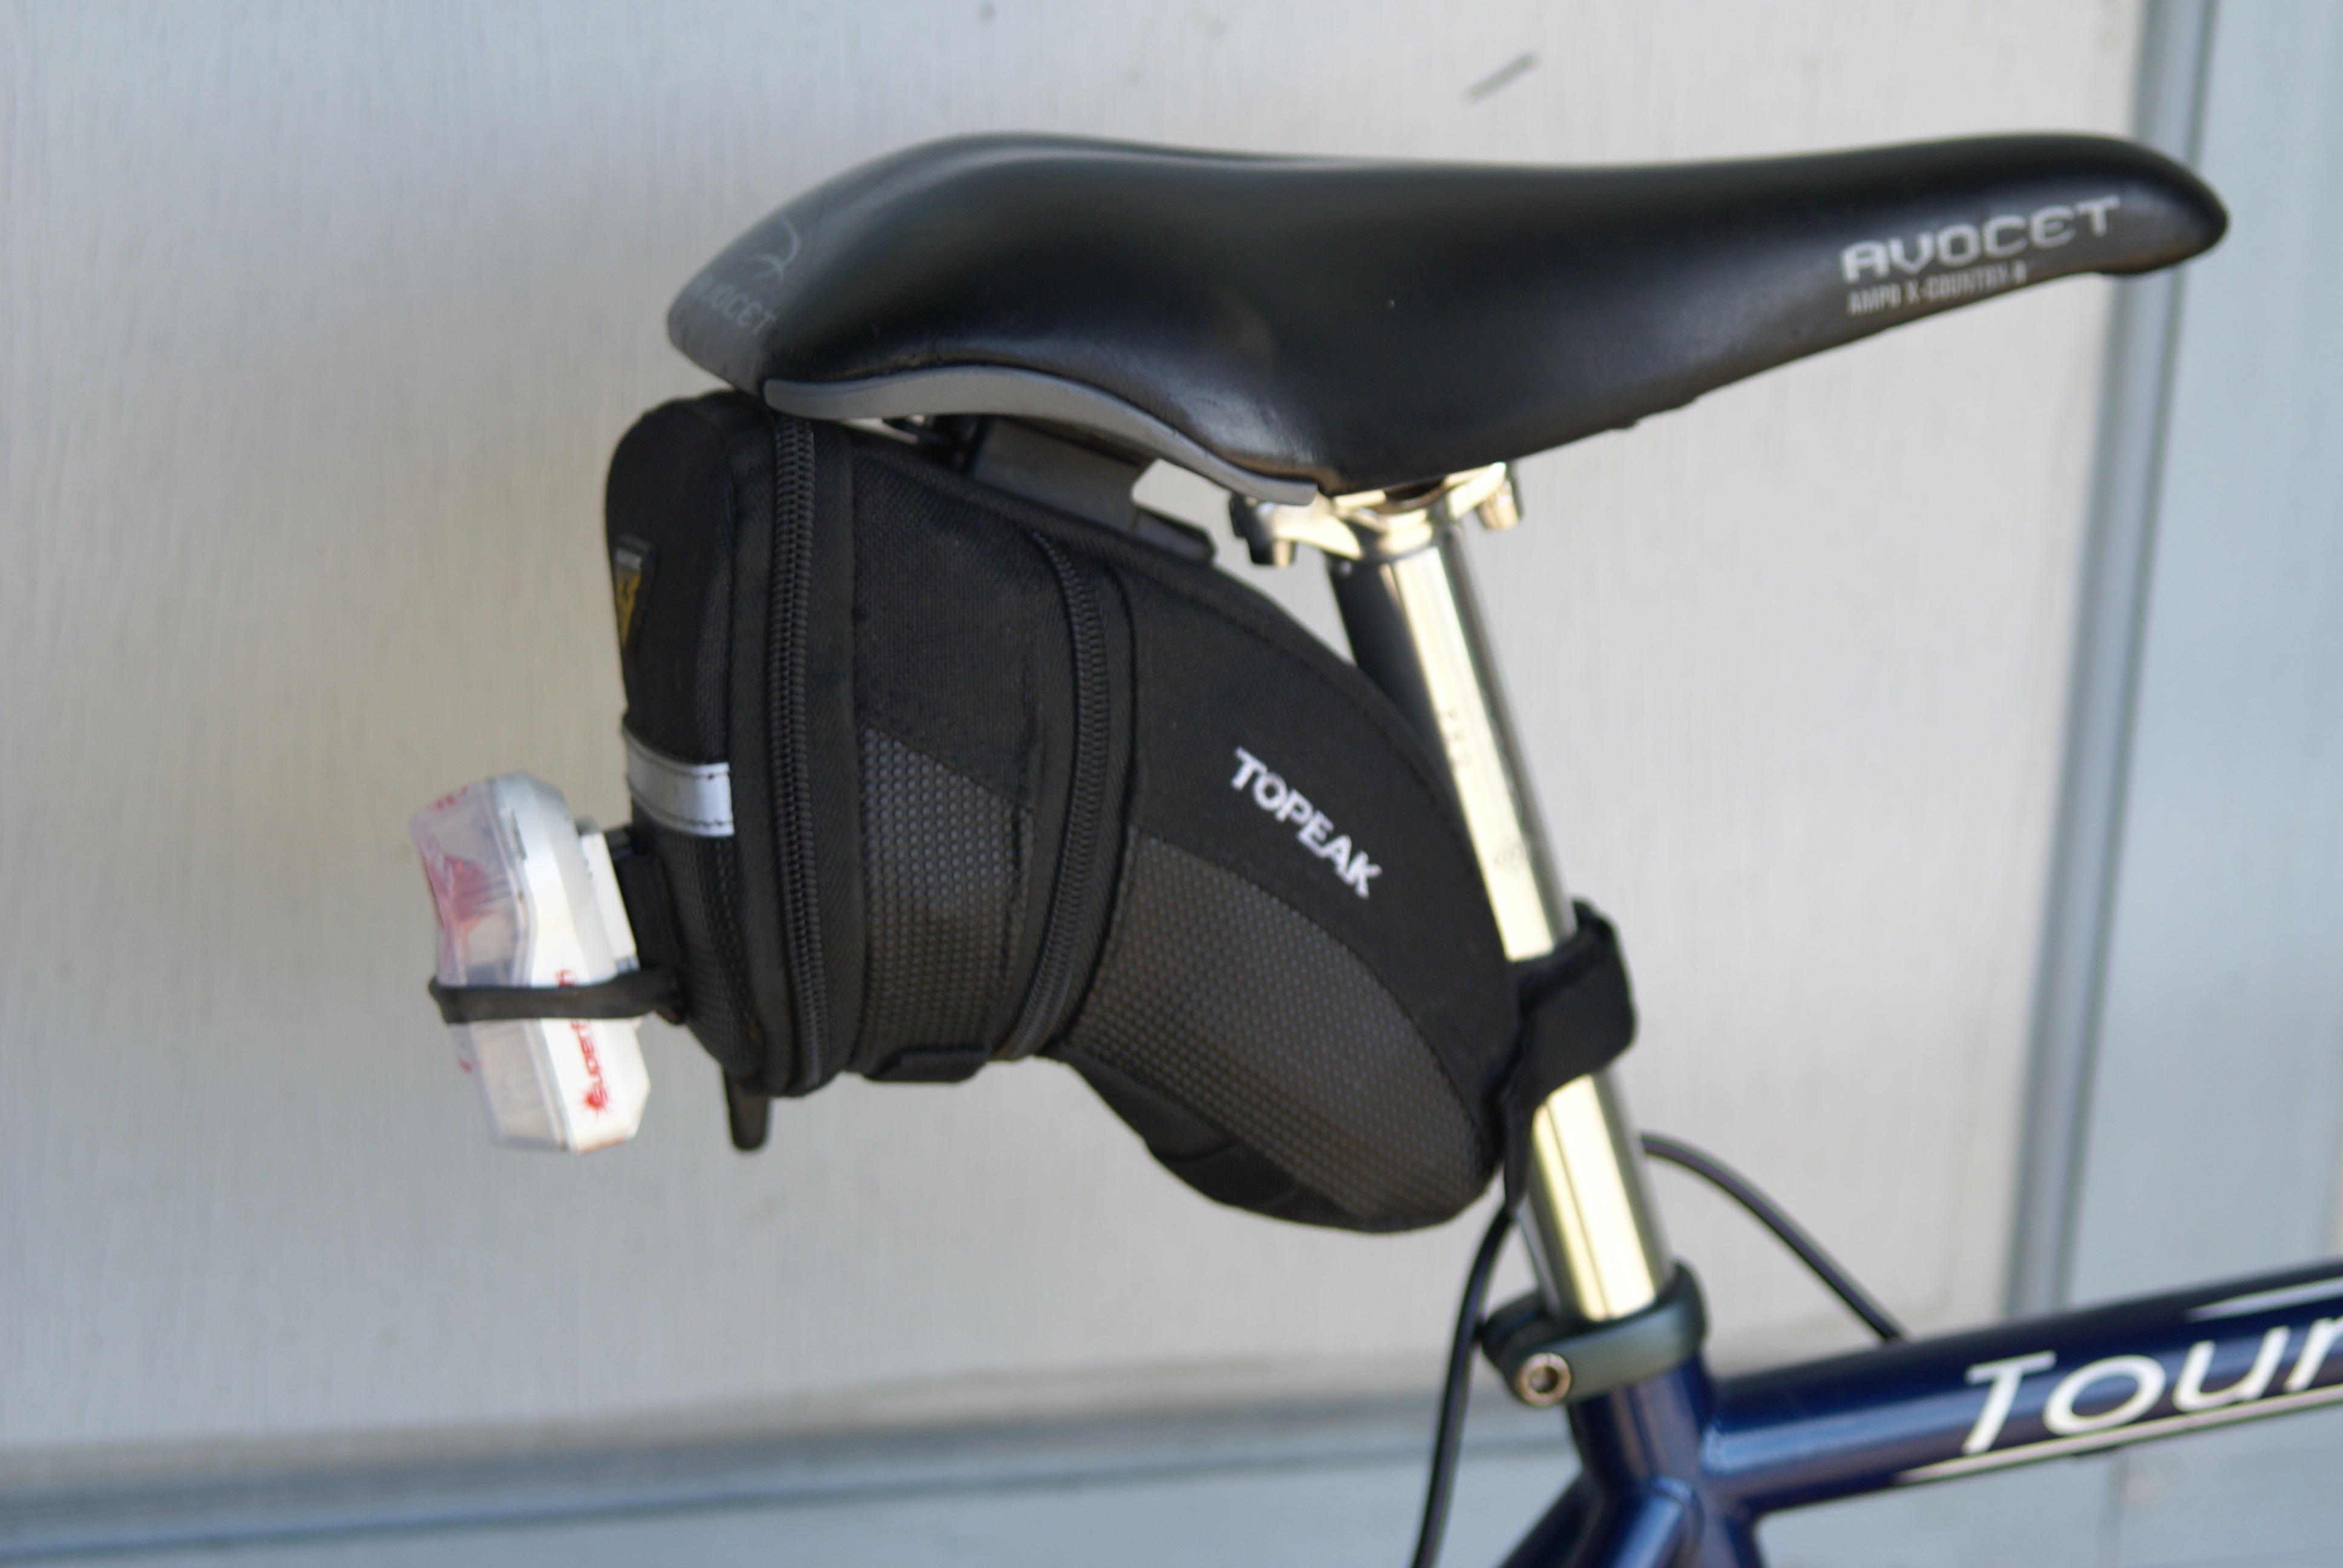
The original Fuji saddle had worn out long ago and I was riding on a Burley saddle salvaged from our original tandem. When I installed the R+E brakes I decided to raise the saddle so that it felt the same as my other bikes, and re-discovered that it was already at the maximum line on the seat post. I got a 400mm Origin8 seat post from Amazon and when I was at Recycled Cycles a few days later I bought a $15 used Avocet saddle. It was a funny “X-Country” shape with a broad kind of shelf in the back to facilitate sliding on and off the saddle during mountain bike races, but I like Avocet and the price was right. I rode it quite a bit and put a lot of energy into the fore/aft and up/down adjustments as I tried to get it dialed in properly. It’s overkill inasmuch as I’m not going to use the carbon shell to steer the bike on technical downhills and I could probably get along without titanium rails, but I told myself that the shelf in the back would keep my wedge bag from getting rained on.
As I continued to ride (in the rain) I discovered that every time I shifted in the back I needed to trim the front derailleur or else it would make noise. I fiddled with the derailleur and with the cable tension and only made it worse. I decided that I wanted to replace the front derailleur – but I wasn’t sure if the problem was there or in the brifters where I couldn’t adjust anything. All of my other bikes had bar-end shifters and I found myself reaching for the end of the bar a lot on the Fuji so I decided that I would both change out the derailleur and swap the brifters for bar-end shifters to be certain that I fixed the problem.
Since I was going to have to mount new brake levers (and since the handlebar tape had come apart again) I figured that it was the right time to trade out the drop bars that had been bent in the accident and to go with the FSA carbon bars that I had on my new bike and on the custom tandem. As I thought about putting all those new components on the Fuji I realized that I probably ought to replace the rear derailleur as well so that I had a matching set – and I started thinking about 10-speed drivetrains.
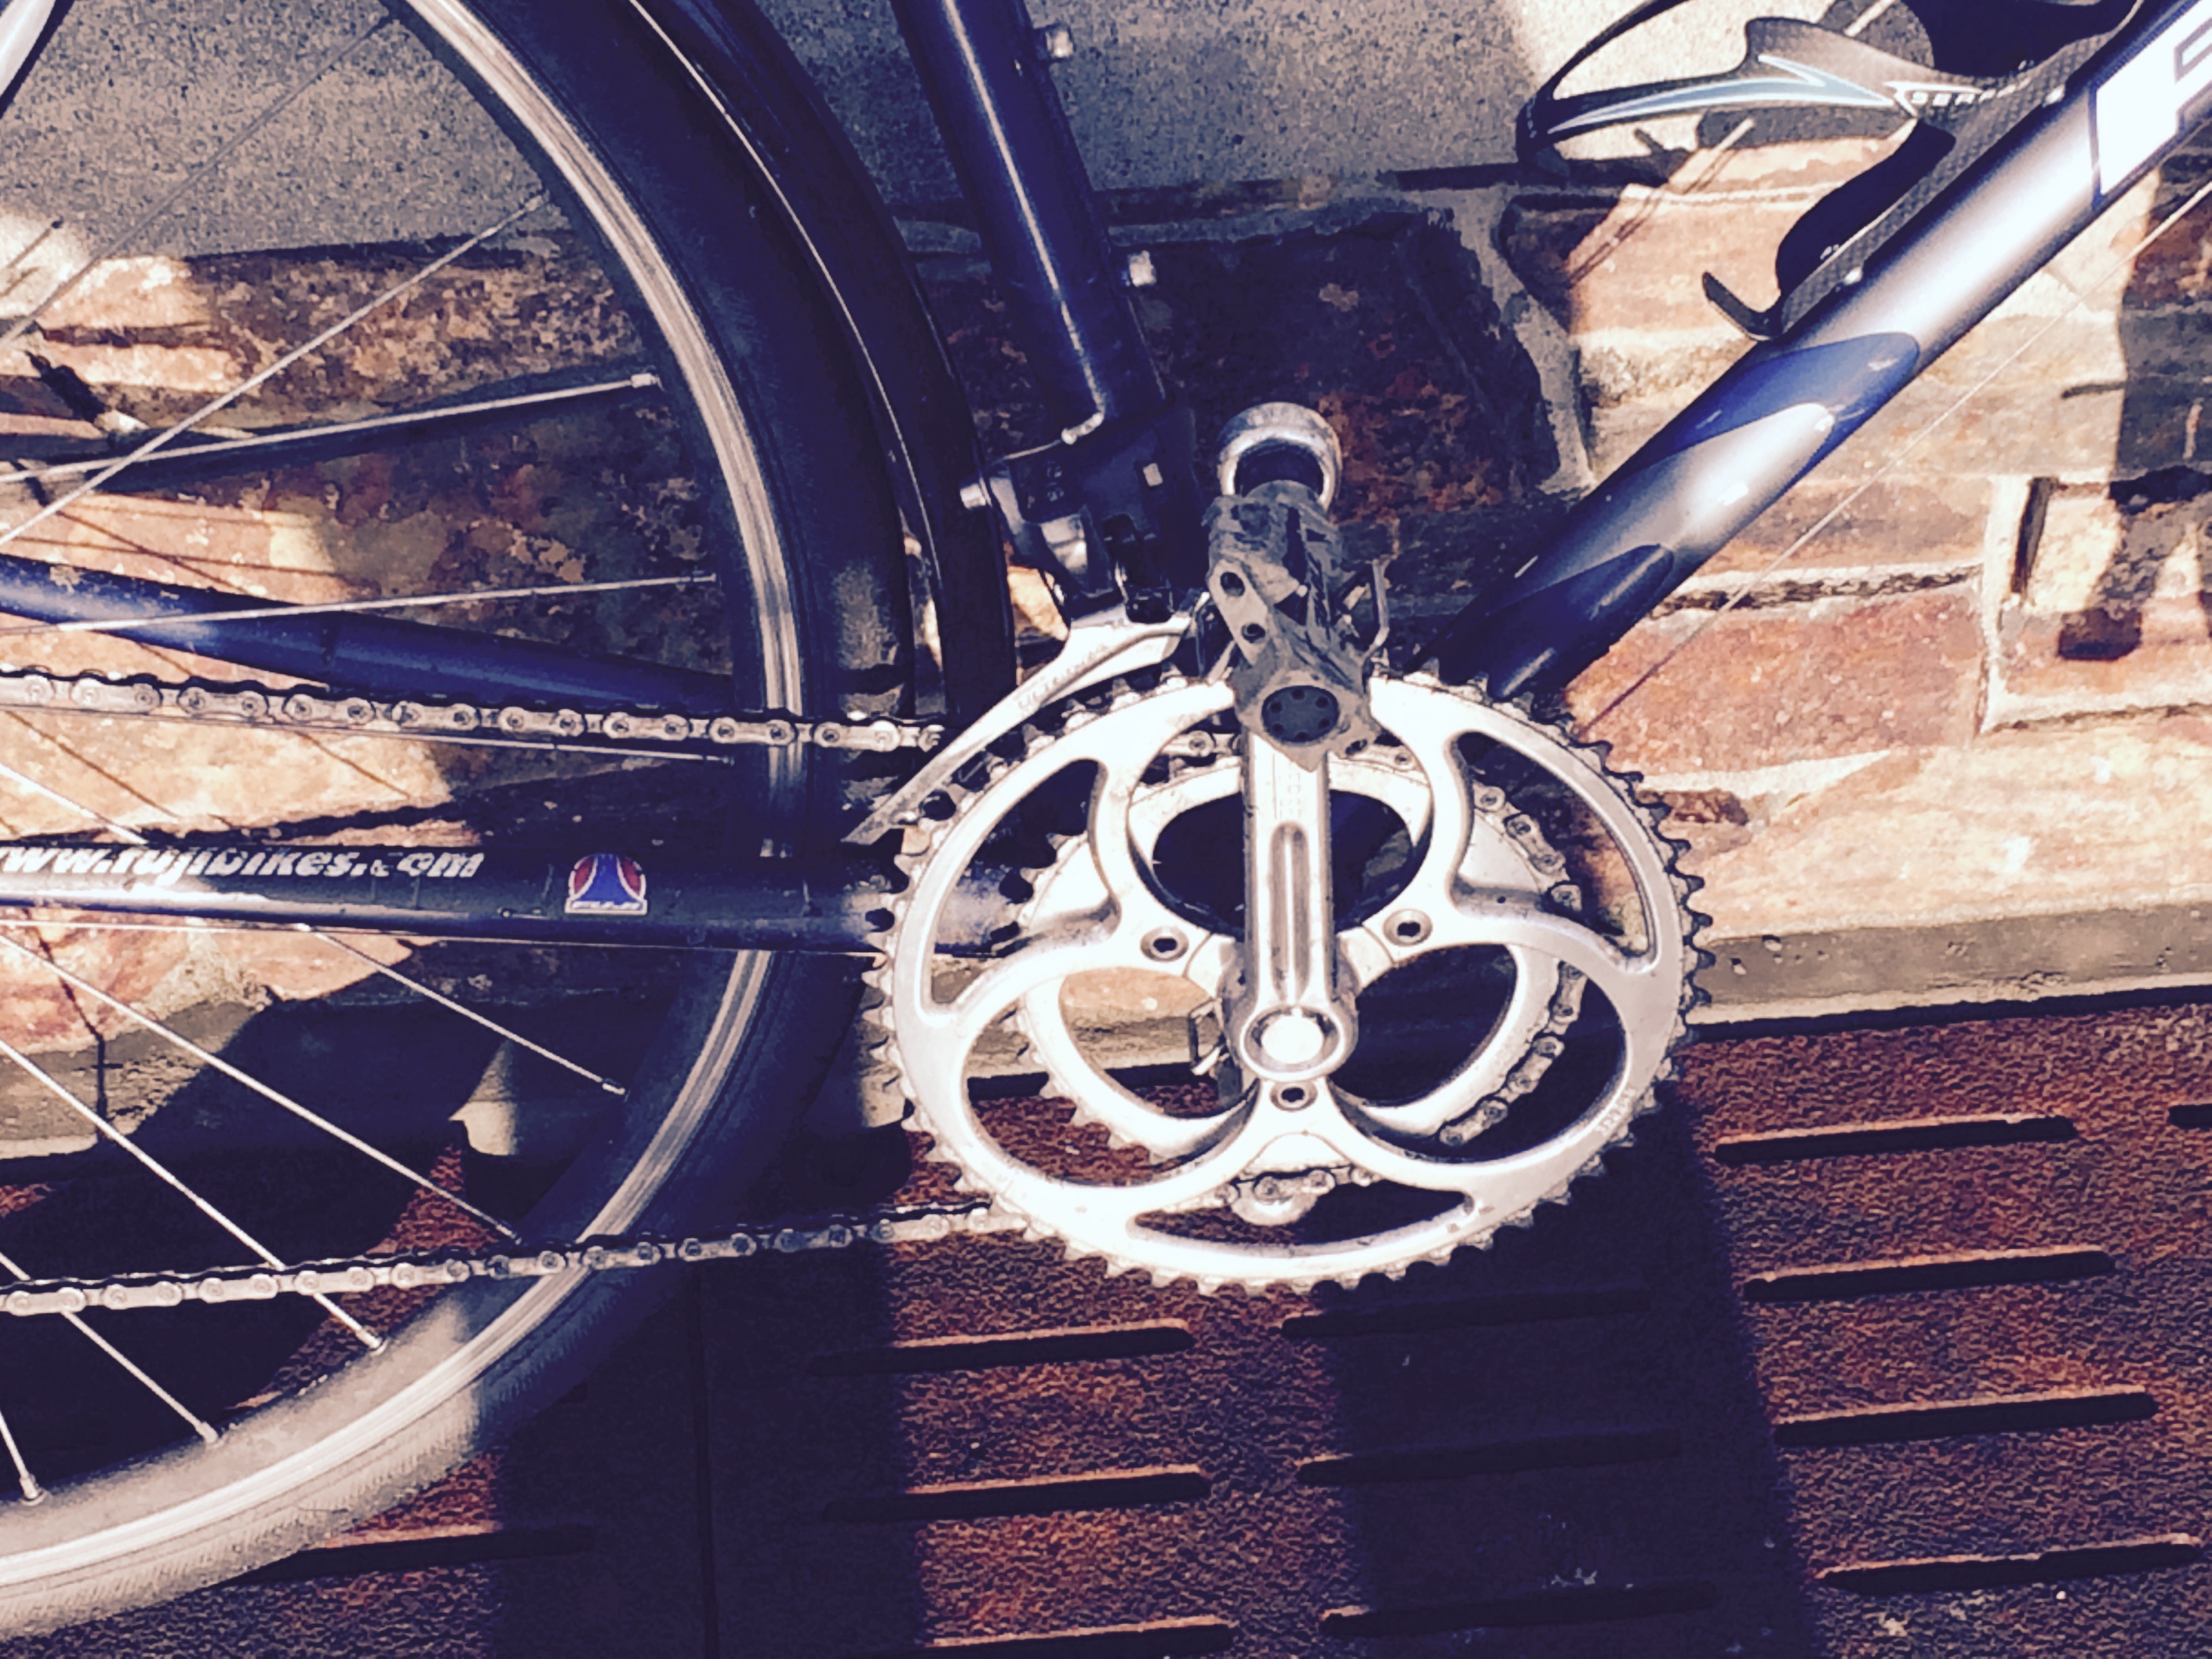
I hadn’t really committed to this project (or to spending a bunch of money on a 15-year old Fuji) when I read an article about the Rene Herse cranks sold by Compass Bicycles. I have a fondness for Compass because of the prose Jan Heine writes about rides terminating in North Seattle, and I share his opinion of “protected” bike lanes. I was struck by the design of the Rene Herse chain rings and decided that they would really look good on the Ibis. It seemed to me that eventually I was going to want to replace the Ibis drivetrain (which I’d left intact when I rebuilt that bike) with a 10-speed set up, and the Rene Herse cranks would really add a kind of elegance to that conversion. I liked the idea that I could do the conversion on the Fuji as a trial run and figure out what I liked and what I didn’t – before I committed to doing it on the Ibis. (I buy the idea that three bolts are adequate and it’s a cool way to get a smaller BCD so that you can go with smaller chainrings and a single set of chain ring bolts.)
Besides the elegance of the design, what sold me on Rene Herse cranks was the fact that they aren’t ramped and pinned. Maybe it’s the retro-grouch in me, but Jan’s description made a lot of sense to me and confirmed what I knew from the guys at R&E and Sheldon Brown:
These features [ramps, pins and hyperglide sprockets] help improve shifting, and make rider skill less important in shifting, but none of these features is actually essential to the functioning of any system.
So, the plan became “convert my 2000 Fuji Touring into a 10-speed with carbon bars and bar-end shifters using Compass’ Rene Herse cranks & rings.” I had a quill adapter and a 1 1/8 inch stem that I could use with large diameter handlebars. I’d already replaced the brakes and saddle/seatpost, so if I replaced the drivetrain all that was left was pretty much the headset and bottom bracket. Compass recommended the SKF bottom bracket (that they distribute) so I figured I’d go with that instead of my usual preference for Phil Woods. Considering how much I was upgrading the bike I decided I’d spring for a Chris King headset.
The next stage of the project was a bunch of indecision about cranks and cogs and derailleurs. Compass said a regular triple front derailleur wasn’t suitable for their triple chainrings but that a front derailleur designed for a double would work just fine. They recommended the Shimano CX70 because it had a flat cage (unlike the stepped cage intended for ramped chainrings.) I was tempted by the idea of a 10-speed double because I rarely use either the biggest or smallest ring on my triples. I didn’t really mind giving up the top gear since I believe the concept that you go faster downhill by getting into a tuck position than by pedaling. I was reluctant to give up the bottom couple of gears, though, and read through the articles and forum posts about using mountain bike cassettes (with a low end of 34 or 36) with road shifters. The consensus was that it used to work but on 10-speed components the road brifters didn’t work and you really needed a long-cage rear derailleur which Shimano didn’t offer in a 10-speed. The solution seemed to be a 9-speed long-cage rear derailleur and the CX70 in front – but it wasn’t clear to me if I needed to do that at all since I was going to be running bar-end shifters not brifters. Eventually I decided that I wanted an upgrade and that if I was touring with a load I would take my new bike. That meant that I could stick with a conventional 10-speed cassette and a standard rear derailleur. I decided I’d go with the CX70 in front (because I read good things about it) but this approach would give me experience with the Compass cranks, experience with a 10-speed drivetrain, and would result in a lighter back-up bike that would be fun to ride. I decided to go with Ultegra components since the CX70 was listed as “Ultegra quality” and since that was a step up from what was on any of my other bikes. Then I needed to decide between compact and standard chainrings for the front… (I’m still not sure what the difference there really is and I settled on 52/36 because the 52 was the largest available and 36 was 16 teeth – the limit for most derailleurs – down from that.)
At the end of February 2015 I had Amazon send me FSA K-wing bars, a Shimano CX70 front derailleur, Tektro RL340 brake levers, Shimano DuraAce shifters, a Shimano 6700 rear derailleur, a Shimano Ultegra 6700 10-speed 11-28 cassette, a Chris King 2Nut 1″ headset, and a Wippermann 10 speed stainless steel chain. (The chain was overkill, but if I continue to ride this bike in the rain it would be nice to have a chain that doesn’t rust.) I had Compass send me a 52/36 crank & chainring assembly, an SKF bottom bracket with a 110 spindle and, on impulse, a $200 Compass 1 1/8 inch stem with a 31.8mm handlebar clamp and 100mm of offset. I also had them send me the special wrenches for the cranks and the bottom bracket.
I went to Recycled Cycles for cables and handlebar tape and got a torque wrench so that I wouldn’t over-tighten stuff on the carbon bars. I also got carbon assembly paste and extra Wippermann 10-speed master-links.
When the Compass shipment came I found that they’d shipped me a 100mm Nitto quill stem instead of the Compass threadless one I’d ordered. I notified them of the error, not mentioning that I’d put a slight rip in the Nitto box, and they agreed to send me the right one and cover the postage for the return. I volunteered that I’d save them the postage by dropping the Nitto stem off at their mailing house since it was only a couple miles away. (I did a loop around West Seattle one morning and came back over the locks and dropped the package off. I confused the mailbox guy, but evidently it got to where it was supposed to.)
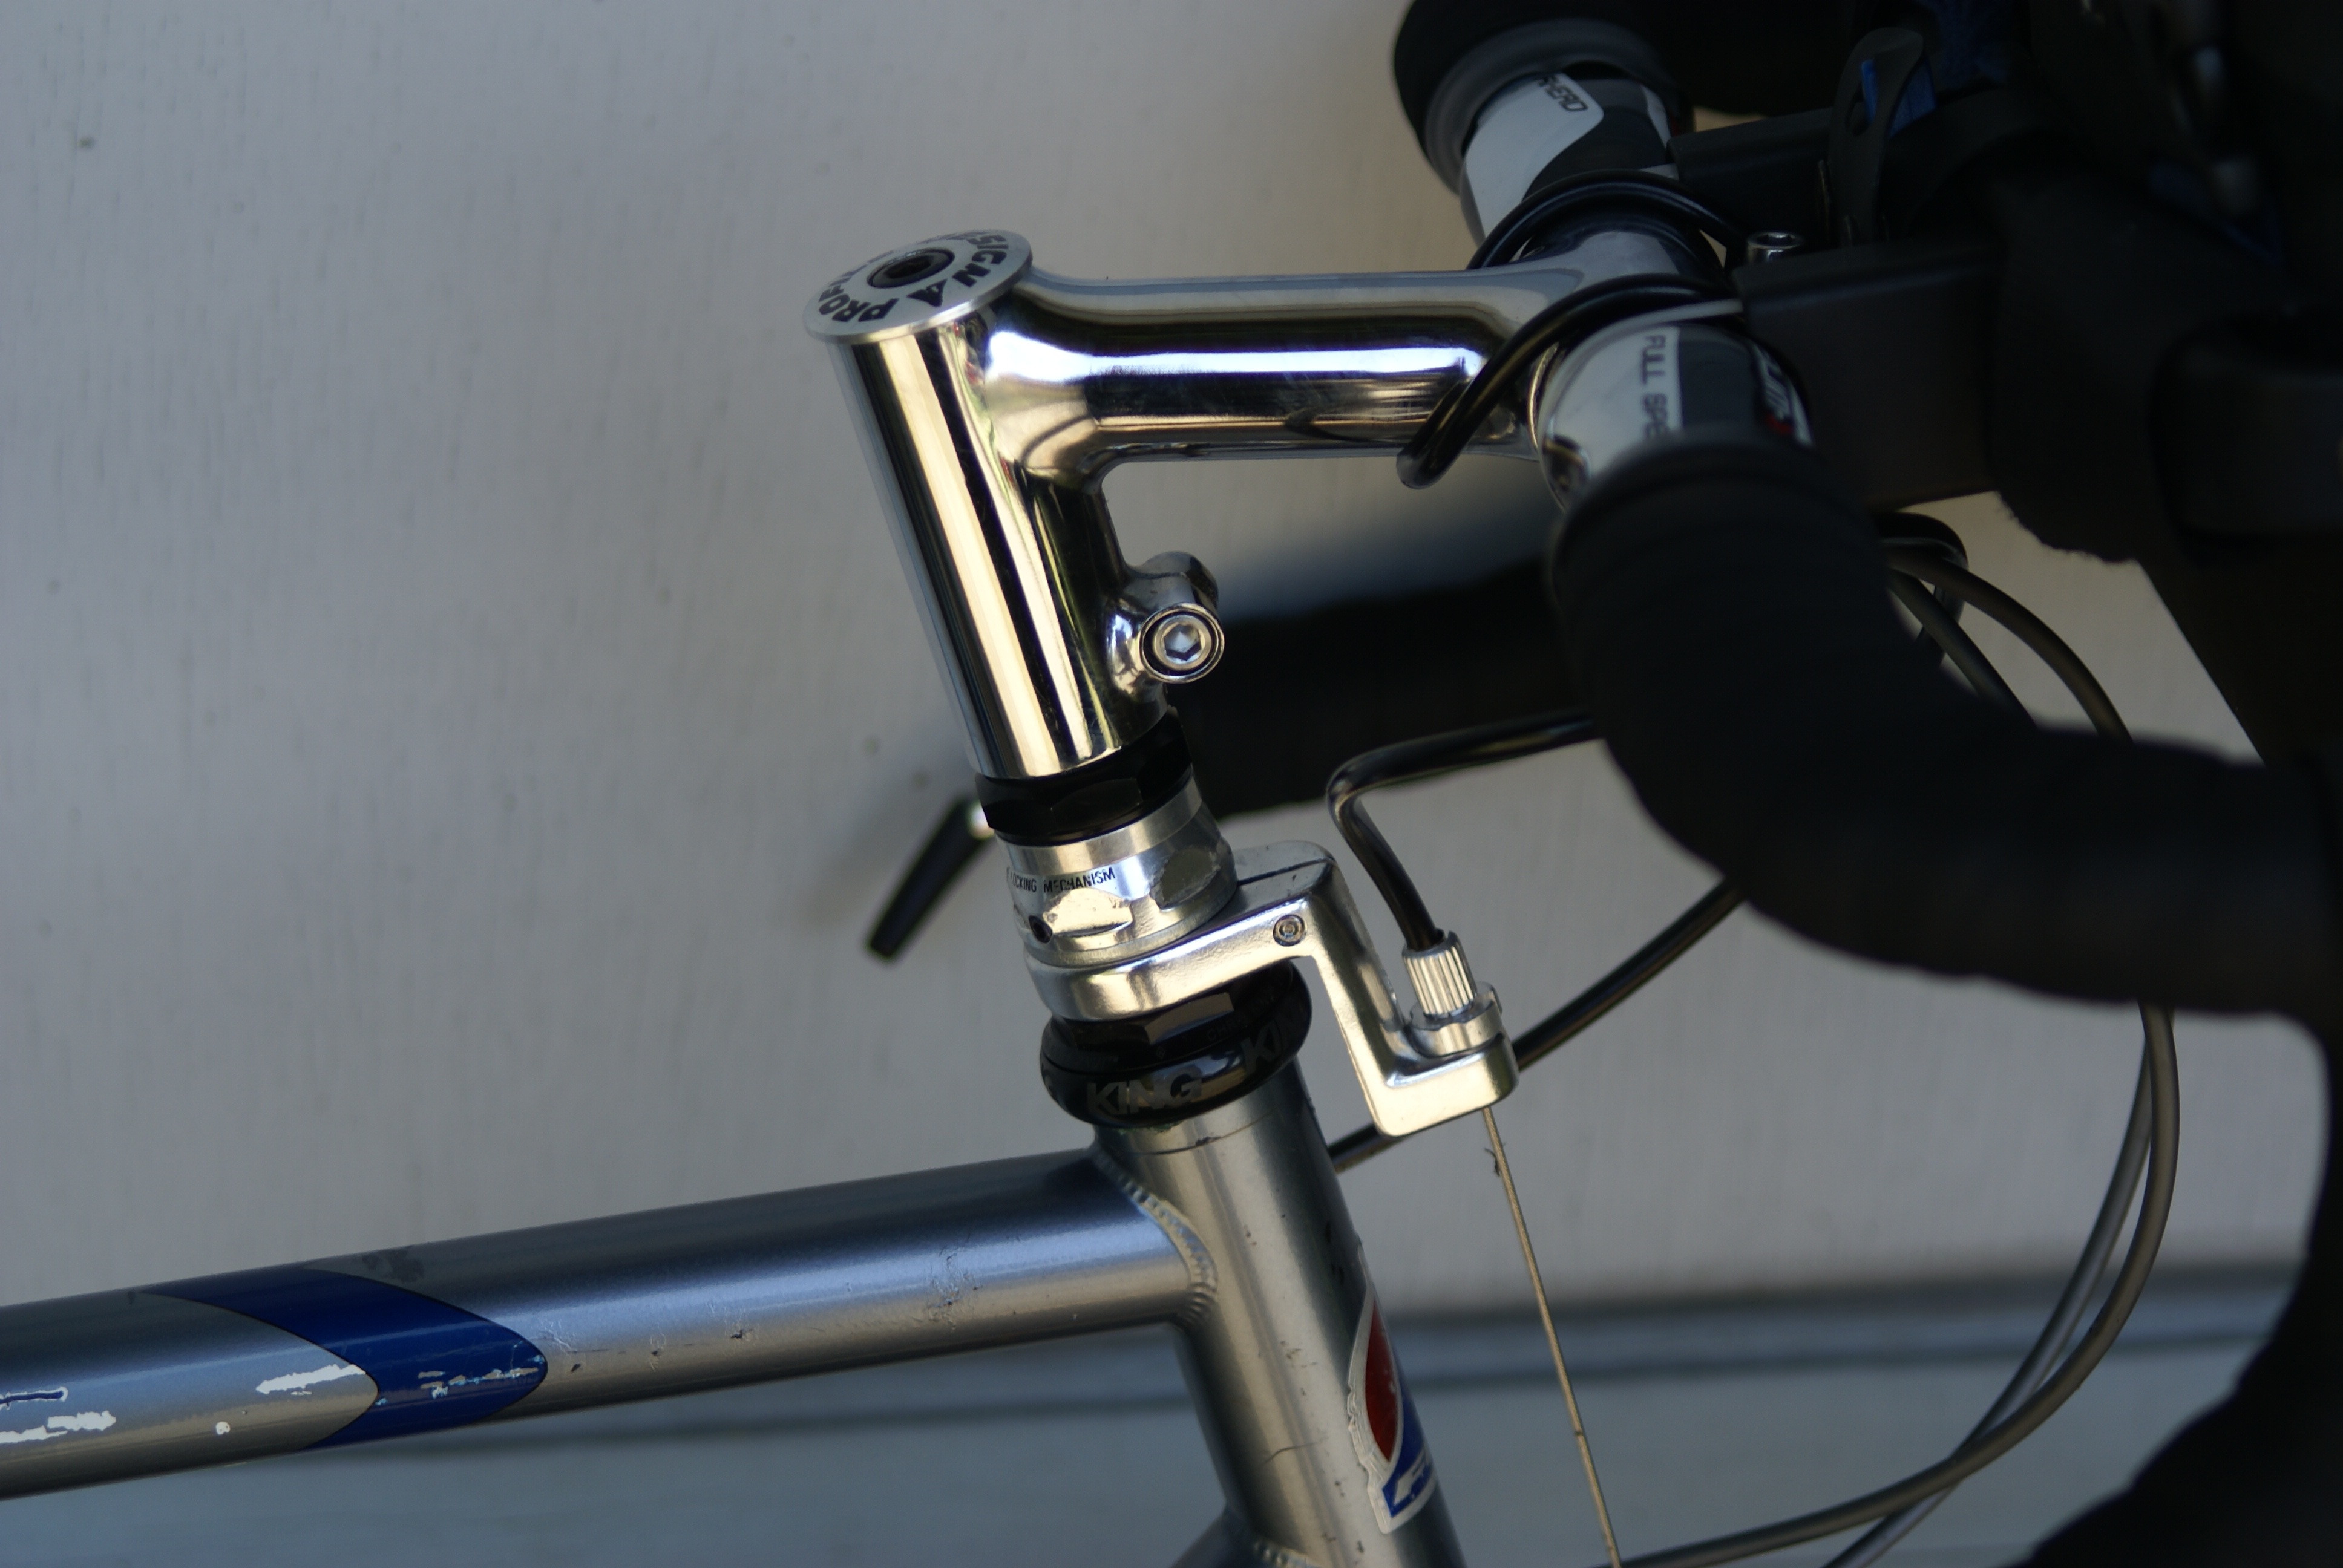
Once I had all of the components I disassembled the bike. Everything was fine until I got to the stem and couldn’t get the quill out of the fork. I spent several days with penetrating oil and pry-bars and ultimately got it to shift slightly but I was clearly going to spring the fork if I kept levering on it so I hauled it down to Recycled Cycles and asked them if they could get it out for me. They couldn’t. They levered it and used penetrating oil and heat and couldn’t move it any more than I did. I finally had them cut it off with their bandsaw – which meant sacrificing the fork. (They told me that the fork was misaligned so that they would have recommended replacing it even if they had been able to get the stem out.)
They had a similar steel fork and extended the threads down lower on the steerer tube so that it would fit the Fuji. (I was under the impression that I could stick a 1 1/8 fork in a 1 inch head-tube just by changing the bearing races. They showed me that I was wrong on that and made me realize that the Ibis rebuild – where I had gone from threaded to threadless – was 1 1/8 to start with.) Given that I couldn’t use a 1 1/8 inch fork, and given that I had gone to some length to get a 1 1/8 inch stem, I was committed to a quill adapter – and the one I had left over from the Ibis project had a 1 1/8 inch quill.
I ordered a new adapter (and a brake cable hanger since the old one hadn’t survived the trip through the bandsaw.) The bearing races on the new headset went in with a little persuasion from a hammer on a 2X4. The bottom plate went onto the steerer tube with the help of a cold punch. Actually the headset was easier to install and adjust than any other threaded headset I’ve used – I guess you get what you pay for. However, leaving the steerer tube long meant that the lock-nut wouldn’t screw down against the other nut because it had a lip that kept it from going beyond the end of the steer tube. I had a 1″ spacer and was lucky that it with my cable hanger took up the right amount of space so that I could tighten the locknut without running into the end of the tube. I was concerned about having the spacer below the locknut and figured that before I got done I’d need to cut the tube to length – and then wondered where I would put the cable hanger.
Before working out cable hanger issues I needed to get the handlebars into the stem and the stem onto the adapter. The clamp on the stem was the right size for the clamping point on the bars, but to get it there I had to go over some much bigger and oddly-shaped sections and around the bends that define drop bars. I stuck a couple of skinny bolts through the clamp holes and worked nuts onto them. I got a dime in-between the end of the bolt and the other side of the clamp and then by tightening the nut I could spread the clamp. I got it around the first bend that way (with no scratches) but had to insert another pair of bolts into the opposing clamp holes to push against the other side of the dime in order to spread it enough to get around the final curve and over the flats. Once I knew I had it I smeared carbon paste on the bars before taking the dime and the screws out and the clamp came back to shape and tightened down just fine. I used my new torque wrench the first time I tightened the clamp, but I trusted my wrists for the subsequent adjustments.
The quill adapter went in just fine – with a lot of lube so that I would be able to get it out again. It turned out that the collar on the stem was about 3/4″ longer than the shaft of the adapter and when I matched the adapter up with the top of the stem there was nothing behind the pinch bolt and I couldn’t secure the stem to the adapter. Consequently, I lined it up with the bottom of the stem which meant that there was nothing for the cap to tighten down against when you set the quill. It tightened okay against the stem, but I didn’t like the void that was left under the cap, I didn’t like using the thin walls of the stem that way, and I didn’t like the fact that the cap didn’t have anything to center itself on. I figured that a 1″ spacer would fit inside the stem and that I could bevel the top if it to match the bottom of the cap, so I put that on the list of things to talk to Recycled Cycles about.
The brake levers went on easily and with nothing to make me think about using the Torque wrench. I had plenty of cable housing left over from the Rincon project. The shifters came with their own cables and housing and they went in with little fuss. I couldn’t figure out how to use a torque wrench inside of the shifter, though. I re-installed the brakes and threaded both brake and shifter cables through the channel in the bars and hooked up the brakes.
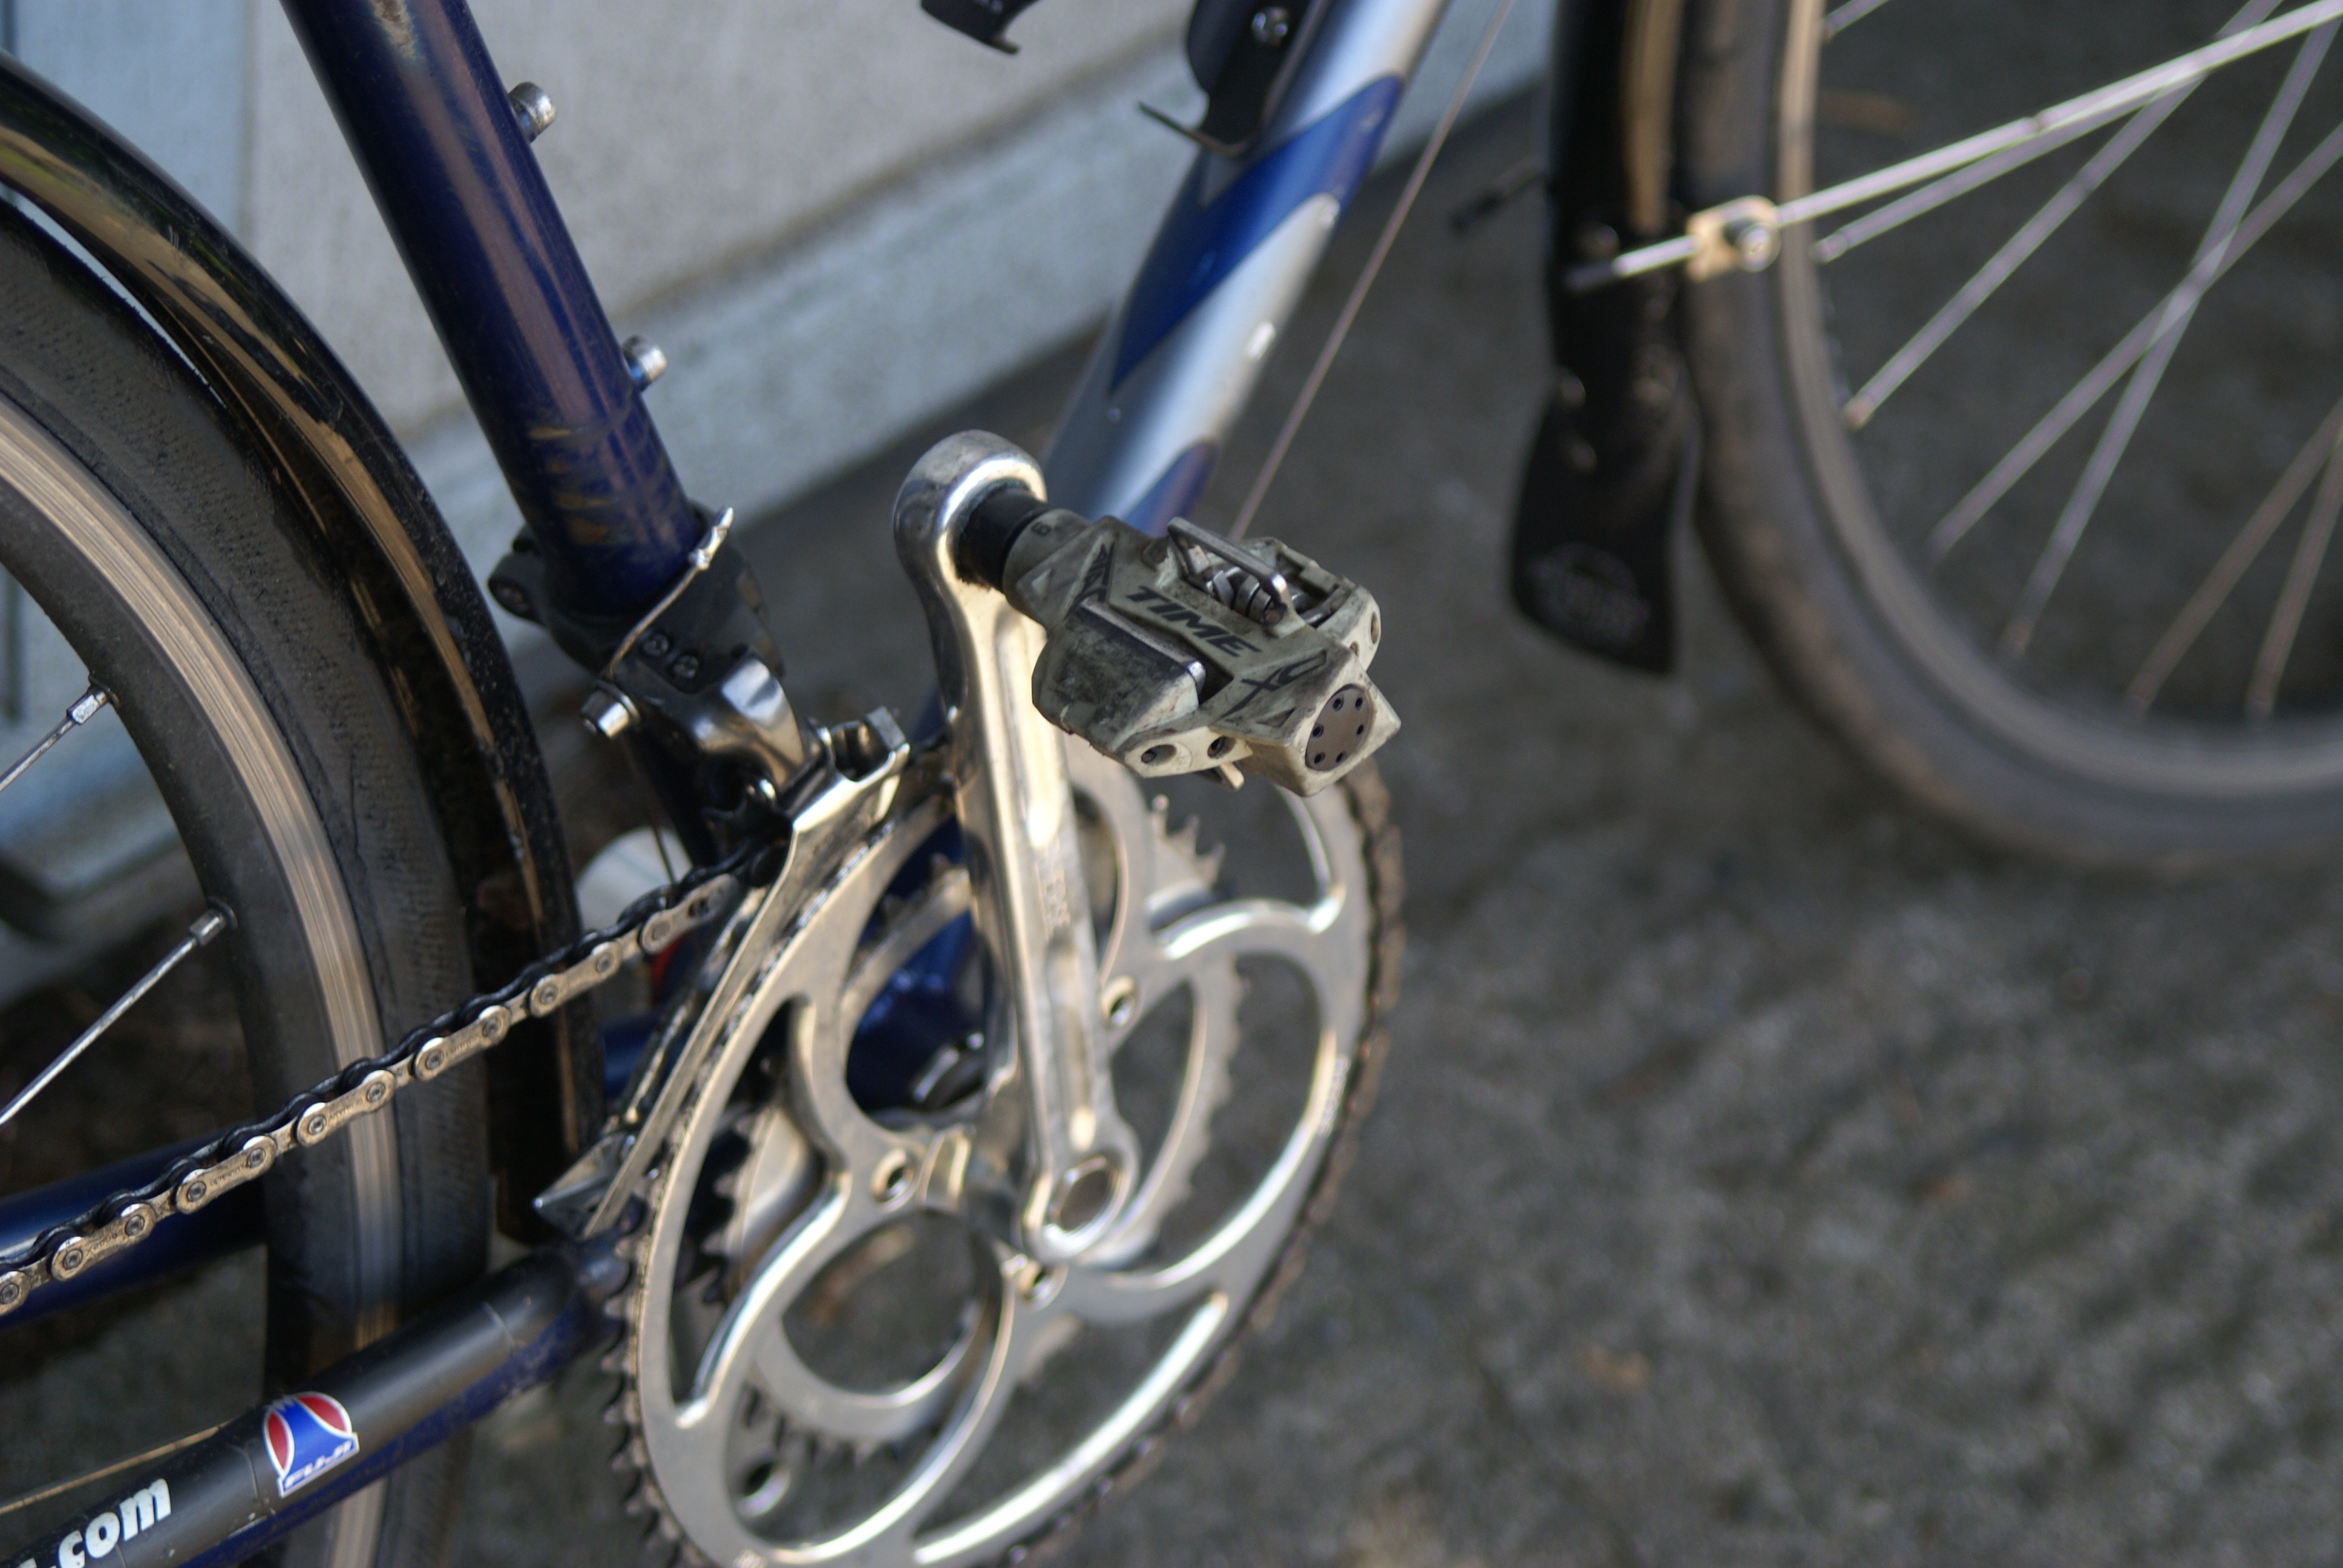
The bottom bracket went in much easier than the Phil Woods’ went into the Ibis. I spent some time on the internet trying to confirm that the alloy cup went on the non-drive side but nobody seemed to think that would even be a question. The cranks were no problem and the bolts tightened down just like they were supposed to (simpler than using self-extracting bolts) but the quarter-inch drive on my torque wrench didn’t support a socket large enough for the bolts (and it would have needed to have been a very thin socket anyway.) The chainrings were already installed on the drive-side crank so I didn’t have to worry about getting the chainring bolts tight enough.
 Getting the cassette off of the hub took a little muscle but the new one went on cleanly enough – I had read that a spacer was needed to mount a 10-speed on a 8/9 -speed hub but since there was no spacer in the box I went without. The rear derailleur went on with one bolt and the cable connected just like it was supposed to. As I went to install the front derailleur I discovered that I had purchased a top-pull mech and my bike was set up to run the cable under the bottom bracket. I kicked myself for not asking more questions – I had seen a comment in an online forum remarking that it was good to see a solid top-pull FD again and when the item description said top-pull I just went with it. At least it was only a $45 mistake. I ordered another derailleur but decided to get a regular Ultegra model 6700 (2×10) instead of the CX70 so that I would have an entirely Ultegra drivetrain – and because I wasn’t certain that “bottom sprung” meant the same thing as “down pull” and I didn’t want another surprise. In the interim I put the Tiagra FD back on and mounted the chain so that I could set the limit screws on the rear derailleur. When I got the new FD I broke the chain again, put the new FD on, and set the limit screws on it, too.
I took a short ride (10 miles up to Shoreline) and found that the handlebars wanted to rotate and that the rear shifting wasn’t right. I tightened the bars (by feel) and fiddled with the cable tension but just succeeded in making it shift less well. I put bolts in all of the open braze-ons and took the bike to Recycled Cycles for an inspection and consult. They supplied a length of 1 1/8″ steerer tube to fill the void in the stem. They replaced the 1″ spacer with a set-screw type nut and a couple of thin spacers. They fiddled with the brakes until they felt they were good. They straightened the derailleur hanger and adjusted the indexing until they felt it shifted pretty well – although they still noted some issues with the smallest cogs. They tightened the crank bolts but said everything else was fine. They were impressed that I got the stem onto the bars with no scratches. I bought a set of full fenders and when I got home I installed them and a bracket for a handlebar bag. (The home-made cable supporting the bracket was too long so I had to cut off one end, which meant going to TrueValue to buy another screw-terminal.) The guys at Recycled Cycles had evidently loosened the bars because the drops were rotated forward; I opened it up and rotated them back again without resorting to the torque wrench. I mounted a mid-fork headlight mount. I mounted a carbon bottle cage that I bought for Will’s bike and which he didn’t want. I replaced the original 15-year old Time Atac pedals (that got scorn from the guy at Greggs) with a set of the X-Country model – XC6 – I bought in 2014 (had to match the saddle.)
I took a longer ride (Mercer Island loop) and found that the chain wanted to skip in the two smallest cogs when I loaded it hard. I also found that the rear brakes squealed. When I got home I cleaned and lubed the chain (the ride was wet) and fiddled with it enough to see that the skip happened when the master link passed the cog. I also adjusted the brake pads to toe-in more. Another short ride confirmed that the brakes no longer squealed but that the chain still skipped. A google query reminded me of this advice from Leonard Zinn:
As always with a Wippermann chain, I would first check to make sure that the ConneX master link is not inverted. It happens all of the time… one side of the link is concave and one is convex (i.e., it is taller above the connector hole). If you let that convex, or taller, edge be facing your cogs, it will lift the chain out of the tooth valley wherever it rides up on the spacer between cogs. On most cogsets, this only happens on the smallest cogs, but on machined SRAM Red cogs, this high spacer situation exists between every pair of cogs, so you will get skipping on every cog.
Orient the ConneX master link so that its taller convex edge is away from the chainring or cog. Another way to think about this orientation is to notice that the pair of connected holes on each plate (into which you push the pin) forms a heart shape. When the chain is on the top of the cog or chainring, make sure that the heart is right-side up. Either way will ensure that the taller, convex link edge is facing outward from the chain loop.
I flipped the link and the skipping stopped.
I taped the bars, then unwrapped them and taped them again to put more padding under the hoods. Then I decided that was too bulky and that I’d be better off if the tape came closer to the center of the bars so I unwrapped them and taped them over again.
I may get a new rack if I ever use this bike in a way that requires panniers again. If I ever have to replace the rims again I’ll probably spring for a whole new wheel set, maybe with Chris King hubs. I think that I may need to replace the straddle cable in the front – the adjustable stopper seems to have its socket stripped out. Someday I may take it over and get it powder coated.
What I like:
- shifting into the lower ring and still having a lot of cogs for shifting down into
- short jumps between gears
- smoothness of headset, bottom bracket & shifters
- lighter weight
- drops at the right height
- bar-end shifters
- brakes that work and don’t scrape
- full coverage fenders that don’t rattle
- stealth value of expensive components on an old frame
What I don’t like:
- chain threatens to hang up when I shift down quickly in front while in a small cog in the rear
- brake levers have a little too much play
- headset stack is too complicated
- handlebar bag bracket flips up
In any event, my “rain bike” is back in service and it feels like it’s brand new! I’m more convinced than ever about converting the Ibis drivetrain to a 10-speed Rene Herse set-up.
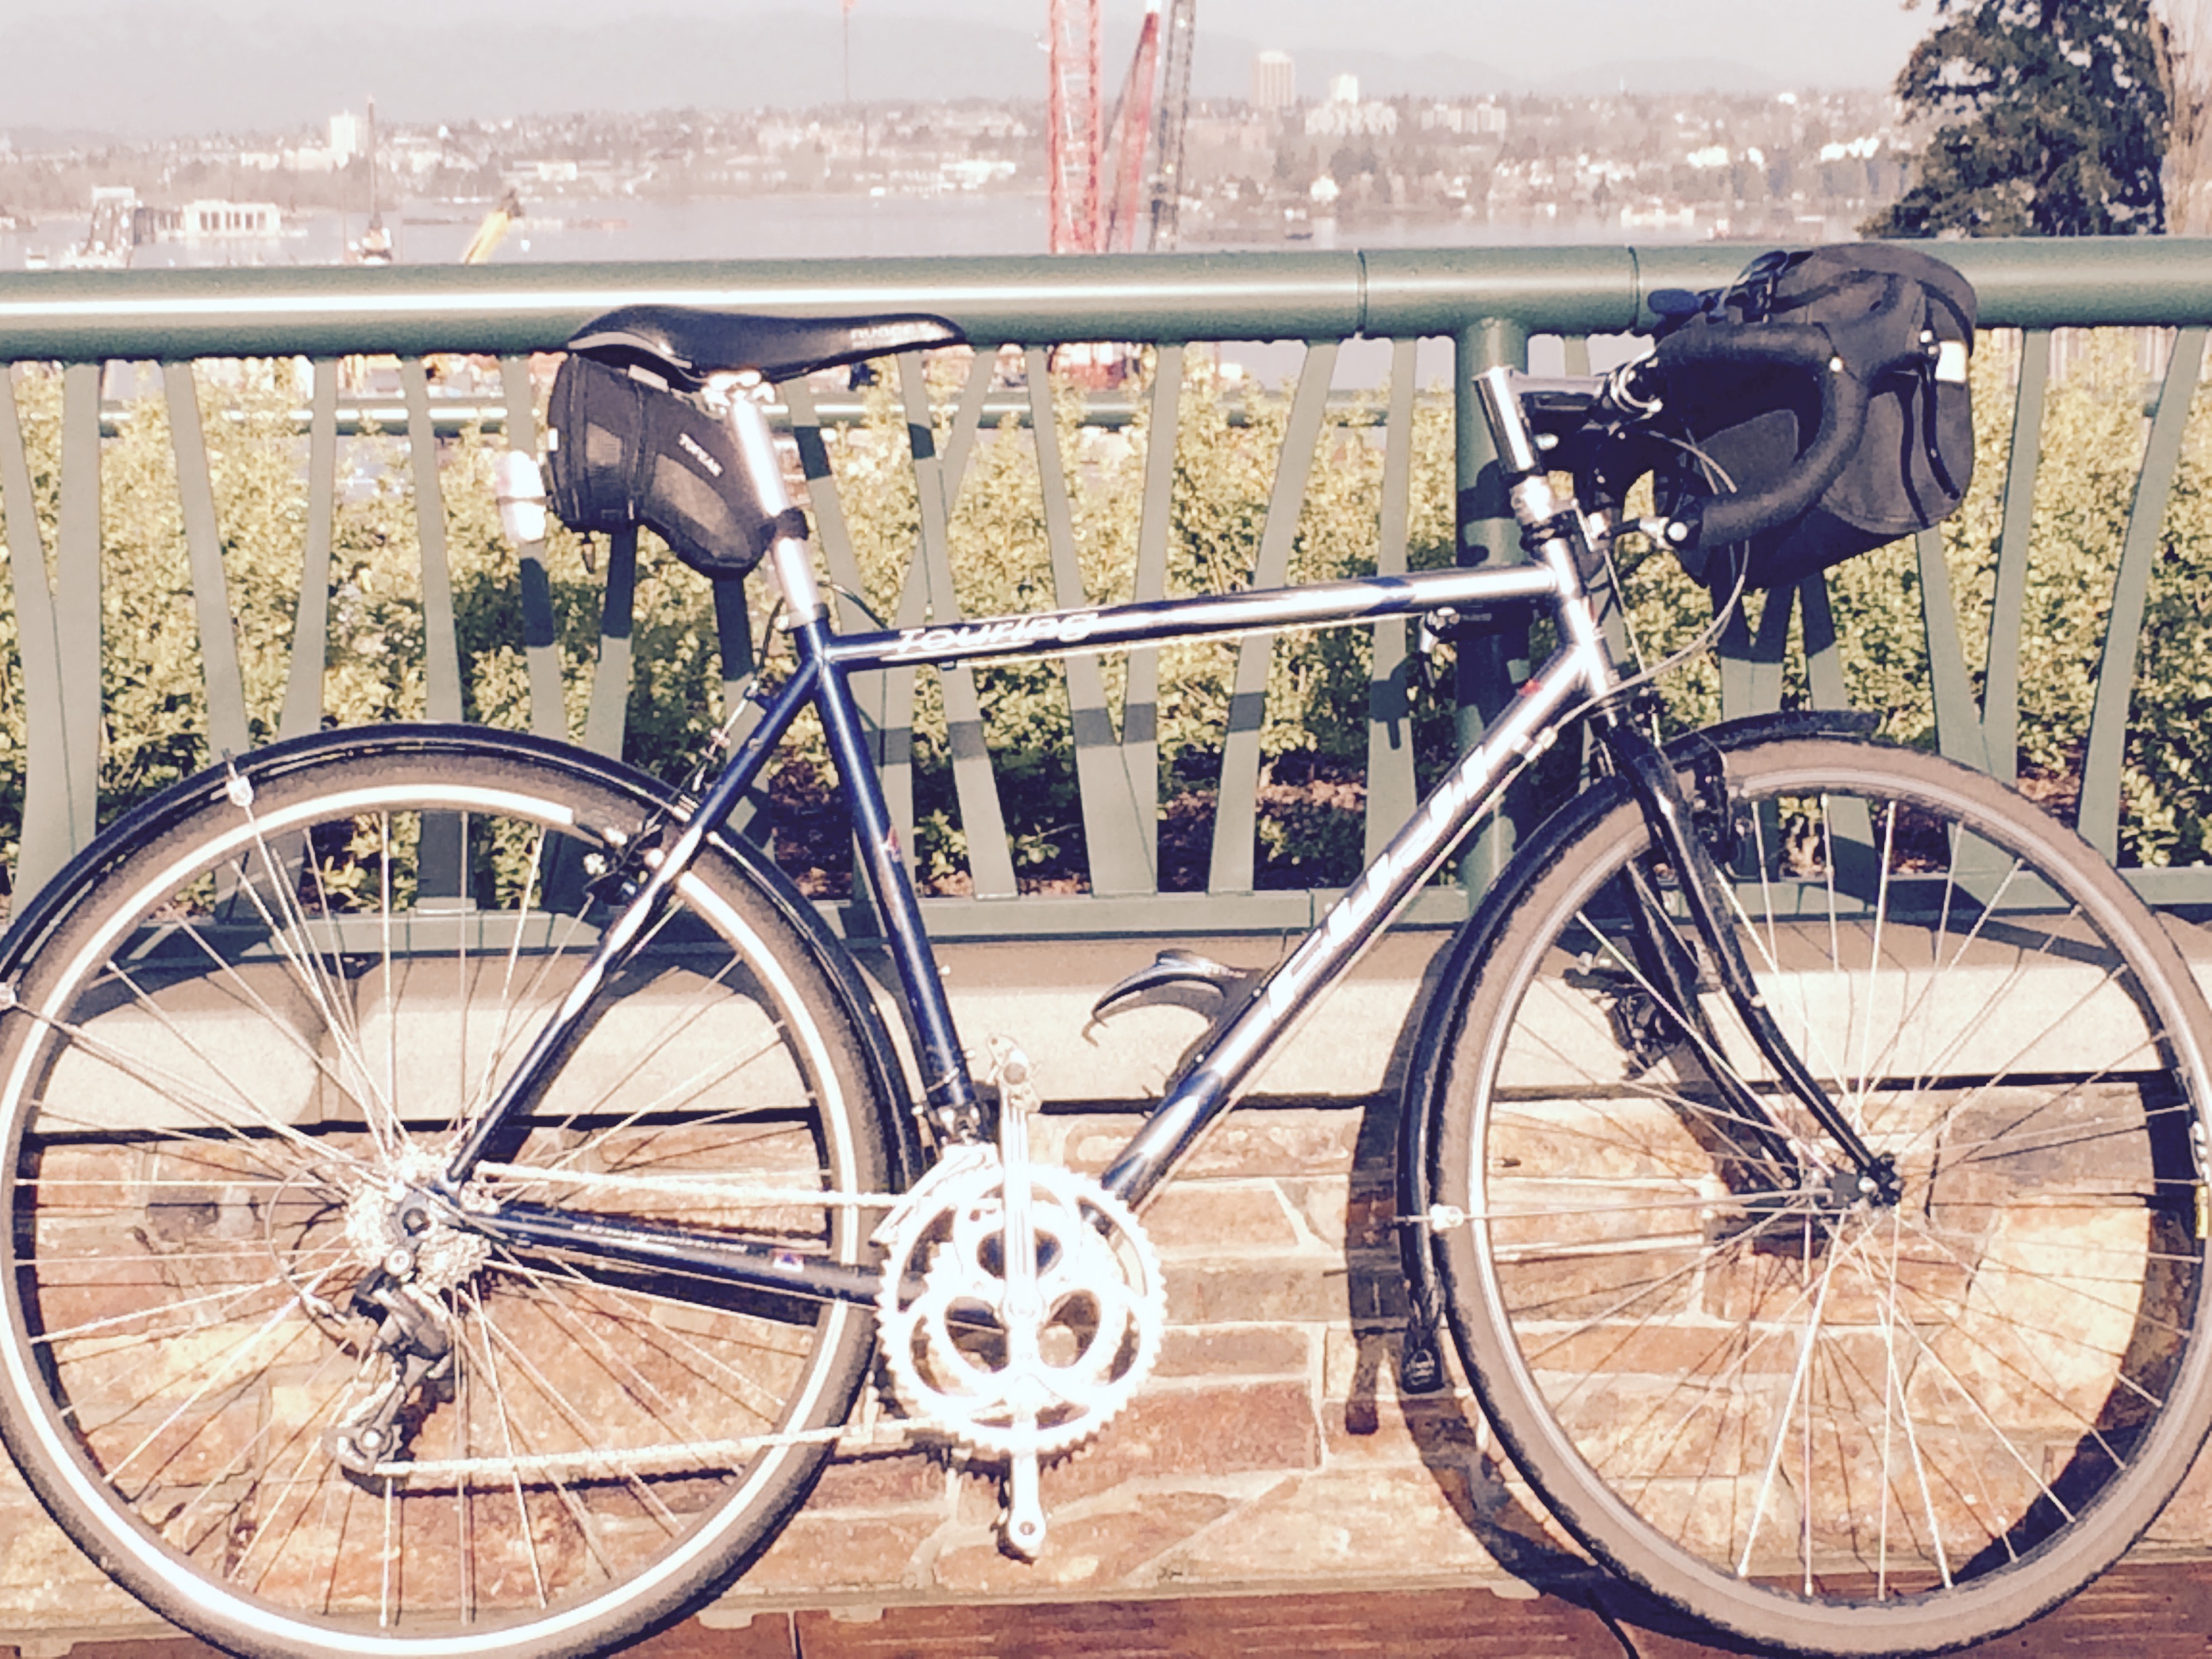
Here are some photos of the bike from the second real ride after the rebuild – a March loop around Lake Washington on a sunny day (plus some shots outside our garage.)
Here’s the final build list:
|
||||||||||||||||||||||||||||||||||||||||||||||||||||||||||
UPDATE
After this was written I tweaked the set-up so that the rain bike could travel. I replaced the pedals with MKS US-B Nuevo ezy superior rinko pedals so that I didn’t need a wrench to unmount the pedals. (The most frequent use is to mount platform pedals when I need to be someplace in street shoes, but it would make it quicker to put the bike in a case, too.) I cut all of the cables (except for the front brake cable) and installed cable splitters. I bought new slotted barrel adjusters and had the braze-ons slotted. (I tried to do this conversion myself and broke a tap in the braze-on and had to be bailed out by the guys at Recycled Cycles.) I replaced the Avocet saddle with a retro-style Selle Anatomica NSX. I bought a Nitto rear rack but ended up using it on another bike.
Over the course of a year I put about 3,000 miles on the Fuji and I still really enjoy the way it rides. I had to replace the drive-side crank because it apparently bent warping the chainring enough that the chain wouldn’t stay on the large ring. (I thought it was a chainring problem but when it wasn’t bolted to the spider the chainring was perfectly flat and a new one didn’t fix the problem.) The Compass guys emailed me
The original Compass René Herse crank arms were made from 6066 aluminum, which is softer than the new 2014 alloy. It is very unlikely that you’ll be able to bend the new crank spider (the spider/tabs are where the previous bend most likely occured, not the main arm), so your rings should run true. The alloy of the rings, 7075, is even harder and very difficult to bend. You can read more about the new alloy and crank lengths here: https://janheine.wordpress.